 by
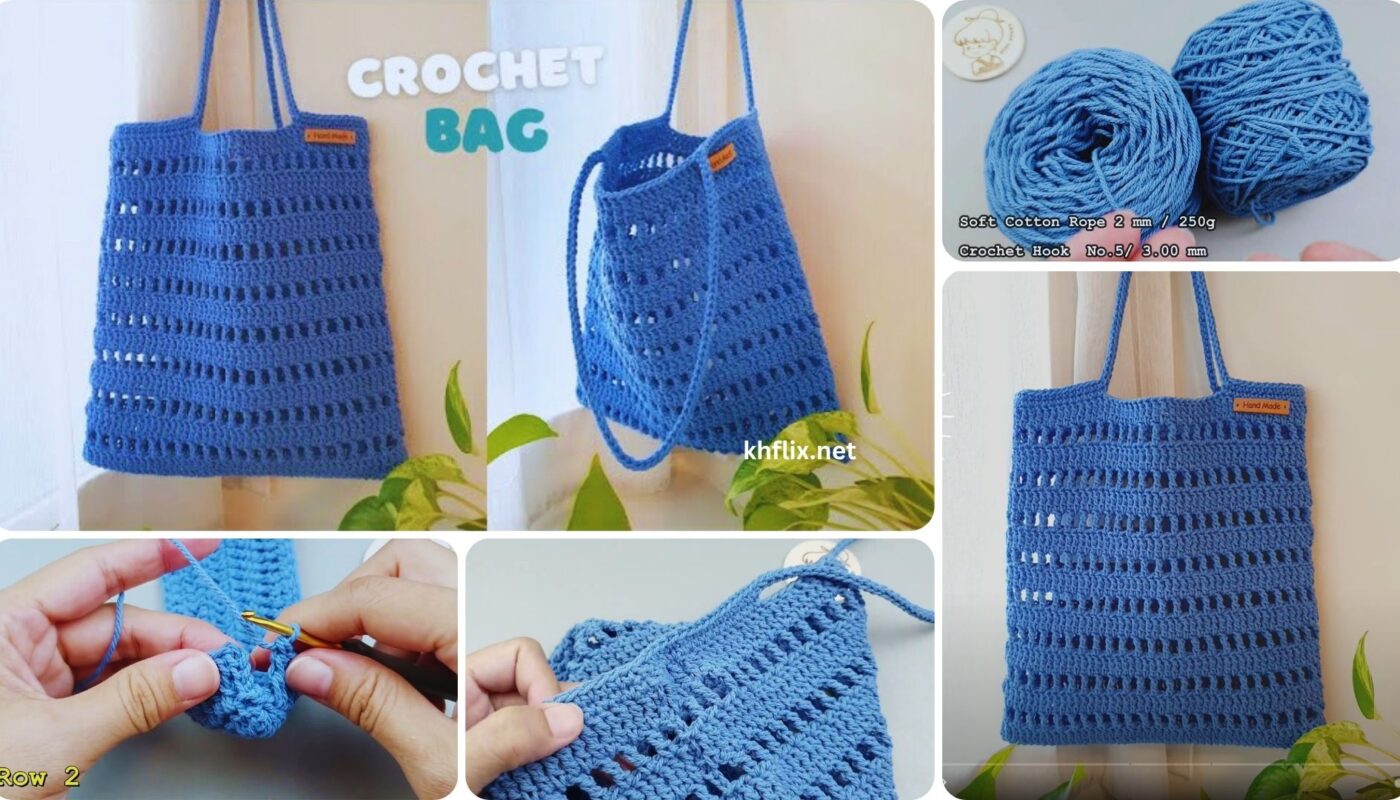
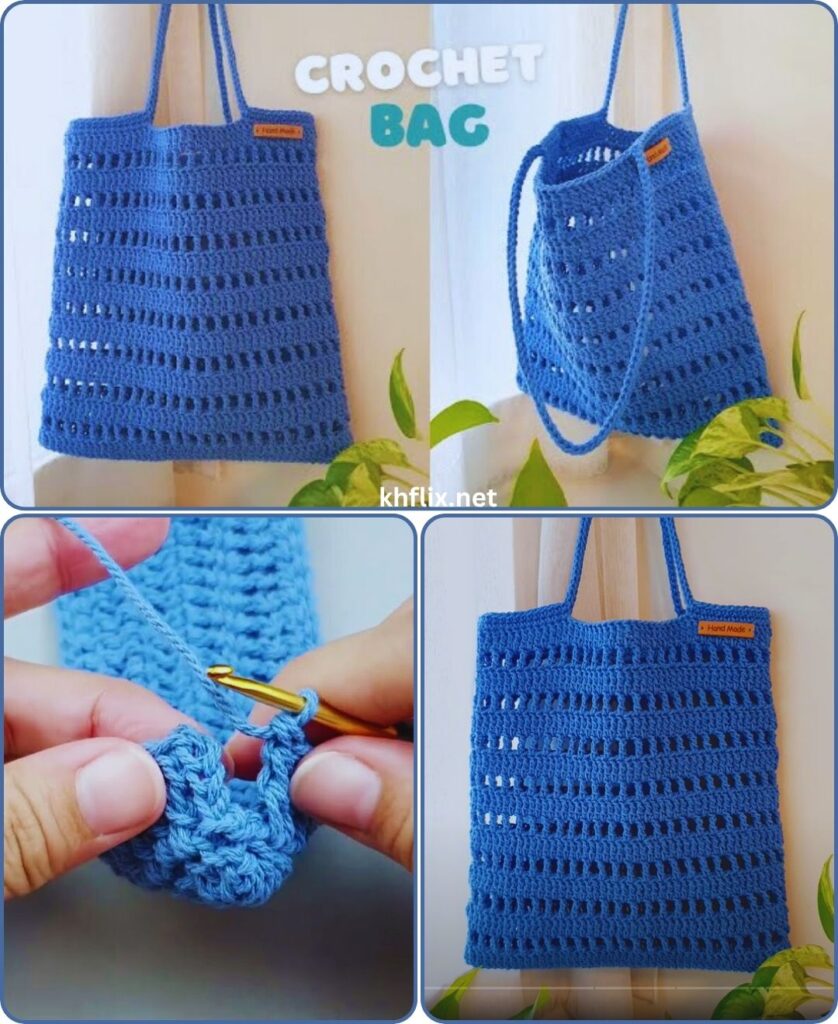
by Let’s crochet a beautiful and practical blue tote bag! This detailed tutorial will guide you through creating a stylish and functional accessory perfect for your everyday needs, whether it’s for groceries, books, or a beach day. Using a lovely blue color will give your bag a serene and classic appeal.
How To Crochet a Blue Tote Bag: Detailed Tutorial Pattern
This pattern will lead you step-by-step in creating a sturdy and chic tote bag, working from the base upwards in continuous rounds for the body, and then adding comfortable, reinforced handles.
Skill Level: Easy to Intermediate
This pattern is great for those who have some crochet experience. You’ll need to be comfortable with:
- Chain (ch): The foundational stitch.
- Slip Stitch (sl st): For joining rounds and neatening edges.
- Single Crochet (sc): A compact, dense stitch ideal for durable bags.
- Half Double Crochet (hdc): A slightly taller stitch that works up quickly while maintaining good density.
- Working in rounds: Crocheting in a spiral.
- Counting stitches: Essential for maintaining the bag’s shape and size.
Finished Tote Bag Dimensions (Approximate):
- Body: 14 inches (35.5 cm) wide x 15 inches (38 cm) tall (excluding handles)
- Handles: 20 inches (51 cm) long each
You can easily adjust these dimensions by changing the starting chain length or the number of body rounds.
Materials You’ll Need:
Gather these supplies to get started on your blue tote bag:
- Yarn: Approximately 800-900 yards (730-823 meters) of Worsted Weight (Medium #4) Cotton Yarn.
- Why Cotton? Cotton yarn is highly recommended for tote bags as it’s durable, holds its shape well, and is easy to wash. Acrylic can work but might stretch more. Choose your favorite shade of blue – from a deep navy to a sky blue, or even a variegated blue for added interest!
- Crochet Hook: Size I/5.5mm. This hook size generally creates a firm, dense fabric with worsted weight cotton, which is perfect for a strong tote bag that won’t sag excessively when filled. If your stitches feel too loose or too stiff, adjust your hook size accordingly.
- Yarn Needle (Tapestry Needle): An absolute must for seamlessly weaving in all those loose yarn tails, giving your bag a professional, finished look.
- Scissors: For cutting yarn.
- Stitch Marker (Optional but Highly Recommended): Very helpful for marking the beginning of rounds when working in a continuous spiral, to avoid losing your place.
Gauge (Crucial for a Sturdy Bag!):
Achieving the correct gauge is important for your bag to be the intended size and, more importantly, to have the necessary density and sturdiness to function as a reliable tote.
- In single crochet (sc): Aim for 14 sc and 16 rows = 4 inches (10 cm).
- How to check your gauge:
- Chain 16.
- Single crochet (sc) in the 2nd chain from your hook and in each chain across. You should have 15 sc stitches.
- Work 16 rows of sc (ch 1, turn, sc in each st across).
- Measure your swatch. If it’s smaller than 4×4 inches, try going up a hook size. If it’s larger, try going down a hook size. Adjust until your swatch matches the gauge.
Abbreviations Used in This Pattern:
- ch: chain
- sl st: slip stitch
- sc: single crochet
- hdc: half double crochet
- st(s): stitch(es)
- rep: repeat
- BLO: back loop only
- FO: fasten off
- (): repeat instructions within parentheses a specified number of times.
- []: indicates the total number of stitches you should have at the end of a specific round.
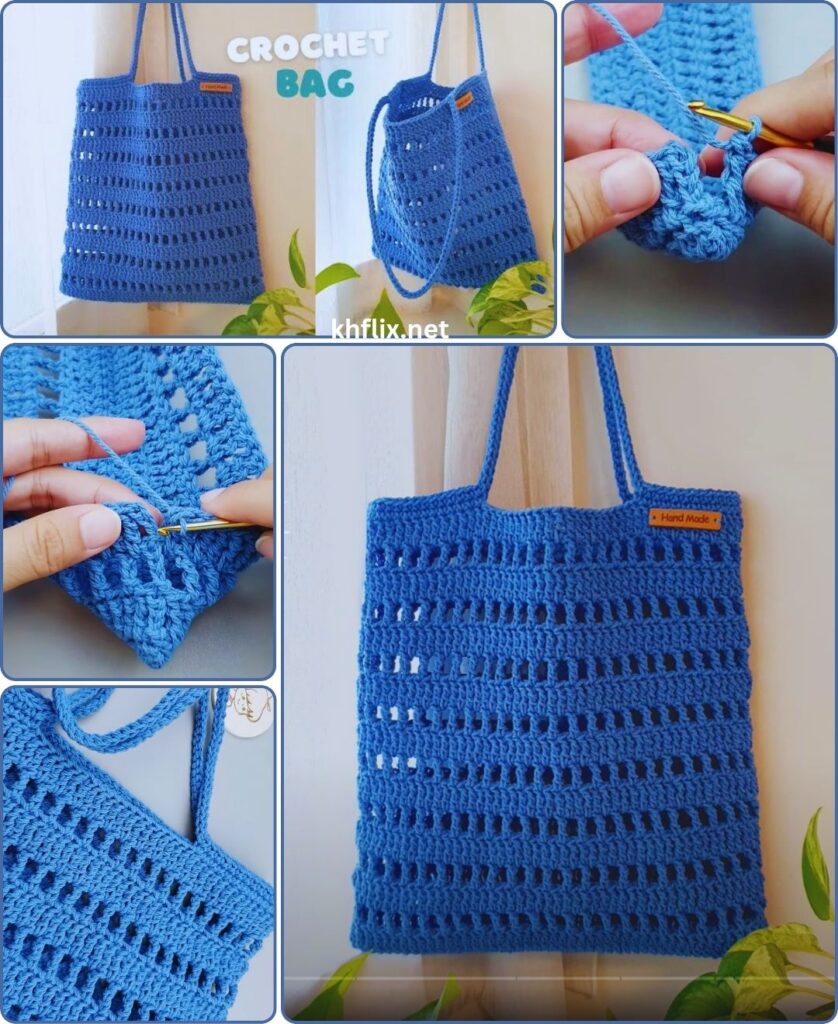
Let’s Crochet Your Blue Tote Bag!
We’ll build this bag from the bottom up, creating an oval base first, then working the body in a continuous spiral, and finally adding the handles.
Part 1: The Bag Base
We’ll start with an oval base using your chosen blue yarn. This provides a sturdy foundation for your tote.
- Foundation Chain:Ch 36.
- This chain length will determine the initial length of your bag’s base. If you want a longer or shorter bag, adjust this number.
- Round 1:
- Work 2 sc in the 2nd chain from your hook.
- Sc in the next 33 chains.
- Work 4 sc in the very last chain.
- Now, rotate your work to crochet along the other side of the foundation chain.
- Sc in the next 33 stitches along the opposite side of the chain.
- Work 2 sc in the very last stitch (this completes the oval shape).
- [You should have 74 sc stitches.] Do not join this round; we’ll work in a continuous spiral for the base. Place your stitch marker in the first sc of this round to mark the beginning of the round.
- Round 2:
- Work 2 sc in the next 2 stitches (these are your increases for the curves).
- Sc in the next 33 stitches.
- Work 2 sc in the next 4 stitches (more increases for the opposite curve).
- Sc in the next 33 stitches.
- Work 2 sc in the next 2 stitches.
- [You should have 82 sc stitches.] Move your stitch marker to the new first stitch.
- Round 3:
- (Sc in next st, 2 sc in next st) rep 2 times.
- Sc in the next 33 stitches.
- (Sc in next st, 2 sc in next st) rep 4 times.
- Sc in the next 33 stitches.
- (Sc in next st, 2 sc in next st) rep 2 times.
- [You should have 90 sc stitches.] Move your stitch marker.
- Round 4:
- (Sc in next 2 sts, 2 sc in next st) rep 2 times.
- Sc in the next 33 stitches.
- (Sc in next 2 sts, 2 sc in next st) rep 4 times.
- Sc in the next 33 stitches.
- (Sc in next 2 sts, 2 sc in next st) rep 2 times.
- [You should have 98 sc stitches.] Move your stitch marker.
- Round 5:
- (Sc in next 3 sts, 2 sc in next st) rep 2 times.
- Sc in the next 33 stitches.
- (Sc in next 3 sts, 2 sc in next st) rep 4 times.
- Sc in the next 33 stitches.
- (Sc in next 3 sts, 2 sc in next st) rep 2 times.
- [You should have 106 sc stitches.] Move your stitch marker.
Part 2: Building the Bag Body
Now, we’ll work straight up to form the sides of the bag. We’ll use half double crochet (hdc) for a good balance of speed, texture, and density, ensuring a sturdy bag that holds its shape.
- Round 6:
- Work hdc in the back loop only (BLO) of each stitch around. This creates a neat ridge that defines the bottom edge of your bag and helps it stand up straight.
- [106 hdc] Move your stitch marker.
- Round 7:
- Work hdc in both loops of each stitch around.
- [106 hdc] Move your stitch marker.
- Continue Body Rounds:
- Repeat Round 7 (hdc in each stitch around) until your bag reaches your desired height. For the listed dimensions (approx. 15 inches tall), you’ll need around 45-50 rounds total for the body (including the base rounds).
- Once you reach your desired height, sl st into the next stitch to join the round. This creates a fixed starting point for your top edging and handles.
- Do NOT fasten off.
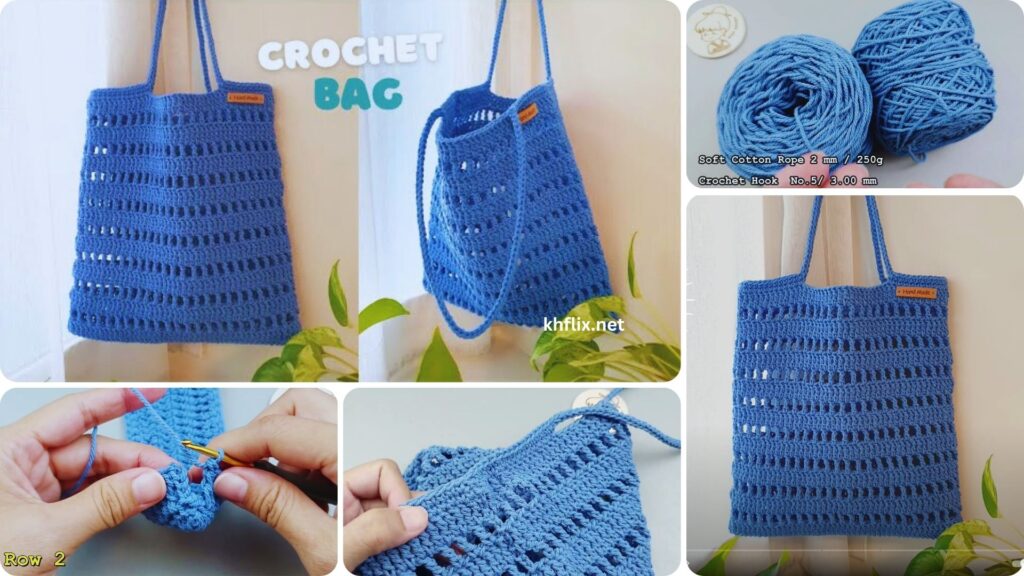
Part 3: Top Edging and Handle Creation
This section finishes the top edge of your bag and creates the two sturdy handles. We’ll use single crochet (sc) for maximum durability.
- Round 1 (Top Edging):
- Ch 1 (does NOT count as a stitch).
- Sc in each stitch around.
- [106 sc]
- Sl st into the first sc to join.
- Ch 1, turn. (Turning here helps align the handles properly and creates a stronger edge).
- Round 2 (Handle Placement):
- Sc in the first 18 stitches.
- Ch 45 (This creates your first handle. Adjust this chain length for longer or shorter handles. 45 chains make a roughly 20-inch handle).
- Skip 17 stitches (these skipped stitches form the opening for your bag).
- Sc in the next 36 stitches.
- Ch 45 (This creates your second handle).
- Skip 17 stitches.
- Sc in the last 18 stitches.
- [72 sc stitches (18+36+18) and two ch-45 spaces.]
- Sl st into the first sc to join. Do NOT turn for the next round.
- Round 3 (Handles Strengthening):
- Ch 1 (does NOT count as a stitch).
- Sc in each of the 72 sc stitches around the body of the bag.
- When you reach a ch-45 handle space, work 45 sc stitches around the chain (this means inserting your hook under the entire chain, not into individual chain links). This will reinforce your handle and give it a clean, rounded look.
- Continue around, working sc in the remaining body stitches and 45 sc around the second chain handle space.
- [162 sc stitches (72 from body, 90 from handles).]
- Sl st into the first sc to join.
- Round 4 (Final Handle Reinforcement):
- Ch 1 (does NOT count as a stitch).
- Sc in each stitch around. This final round of sc will make your handles very sturdy and comfortable.
- [162 sc stitches.]
- Sl st into the first sc to join.
Part 4: Finishing Your Amazing Tote Bag
You’re almost there! These last steps ensure your bag is durable and looks fantastic.
- Fasten Off: After completing your final handle reinforcement round, cut your yarn, leaving a 6-inch tail. Yarn over and pull the tail completely through the loop on your hook to secure the last stitch. Gently tug to tighten.
- Weave in All Ends: This is arguably the most crucial step for a beautiful and long-lasting tote bag.
- Thread each yarn tail onto your yarn needle.
- Carefully weave them through several stitches of the same color on the inside of your bag. Try to go through the middle of the stitches to fully hide the tails. Weave in one direction for a few stitches, then change direction slightly and weave back through a few more stitches. This “locks” the tail in place and prevents it from unraveling or poking out.
- Take your time with this to ensure your bag looks neat, won’t unravel with use or washing, and the tails are completely invisible from the outside.
- Optional: Steam Block (Use Caution with Cotton): While not strictly necessary for a tote, a light steam block can help even out your stitches, relax the fabric, and make the bag sit better.
- Be very careful not to over-steam cotton, as it can lose its shape if over-worked.
- Simply hover a steamer or an iron (on a low, steam setting) over the bag without touching the fabric. Gently manipulate the bag into your desired shape.
- Allow it to air dry completely before use.
You’ve now created a fantastic, handmade blue crochet tote bag! It’s durable, stylish, and completely unique. Enjoy using your beautiful new accessory, and don’t be surprised if you get compliments!