 by
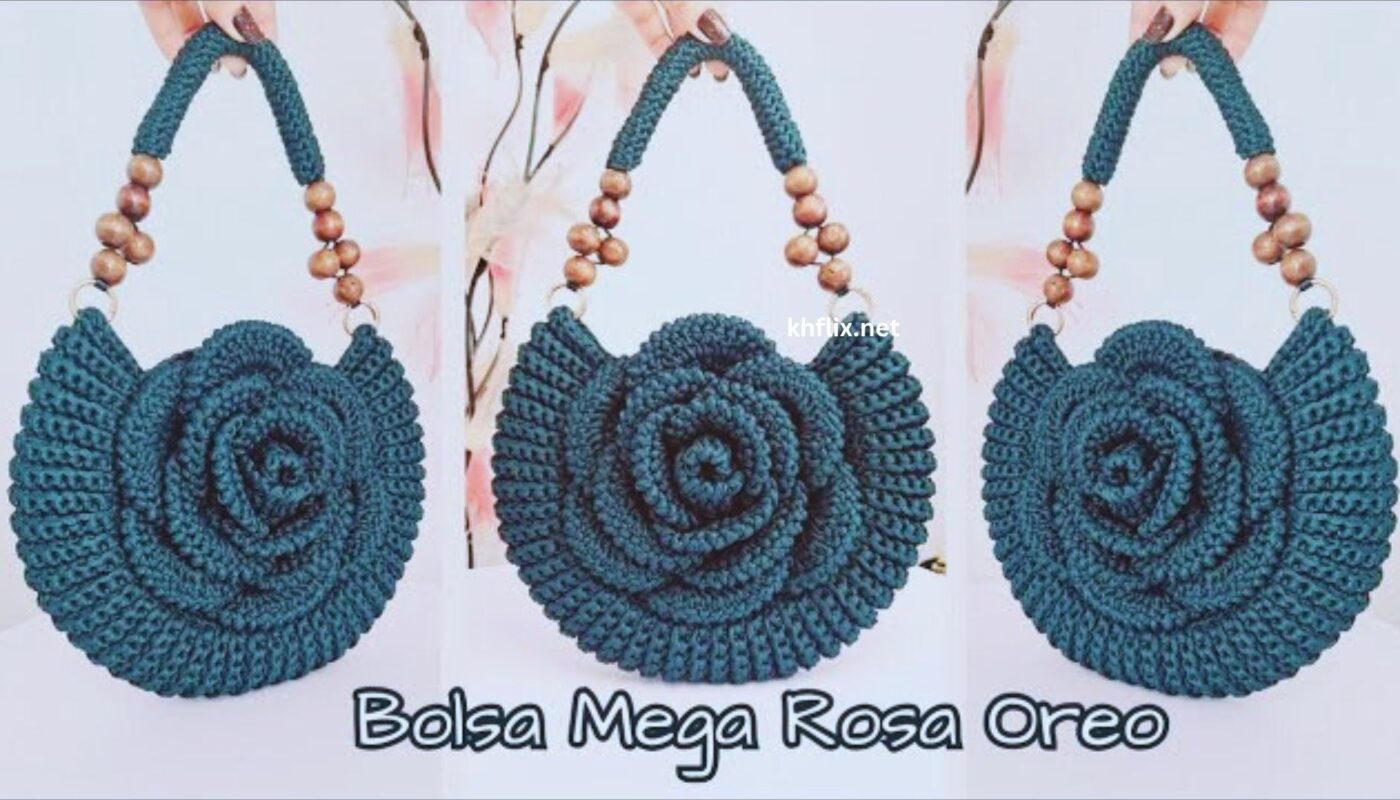
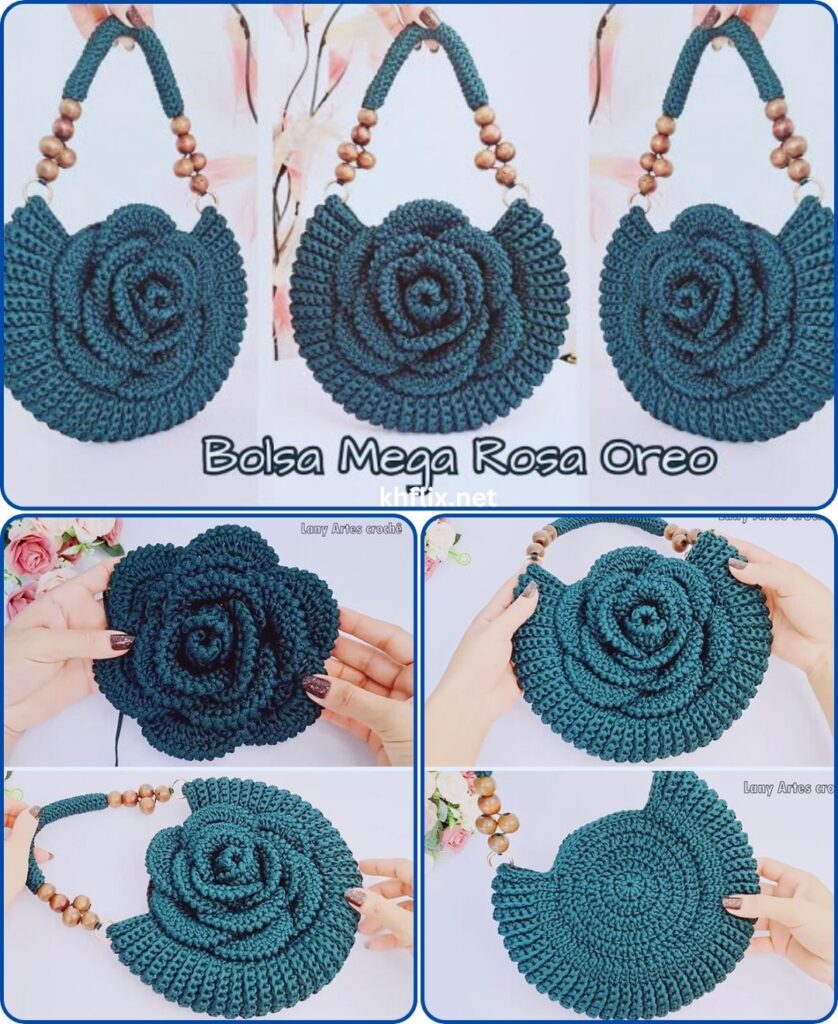
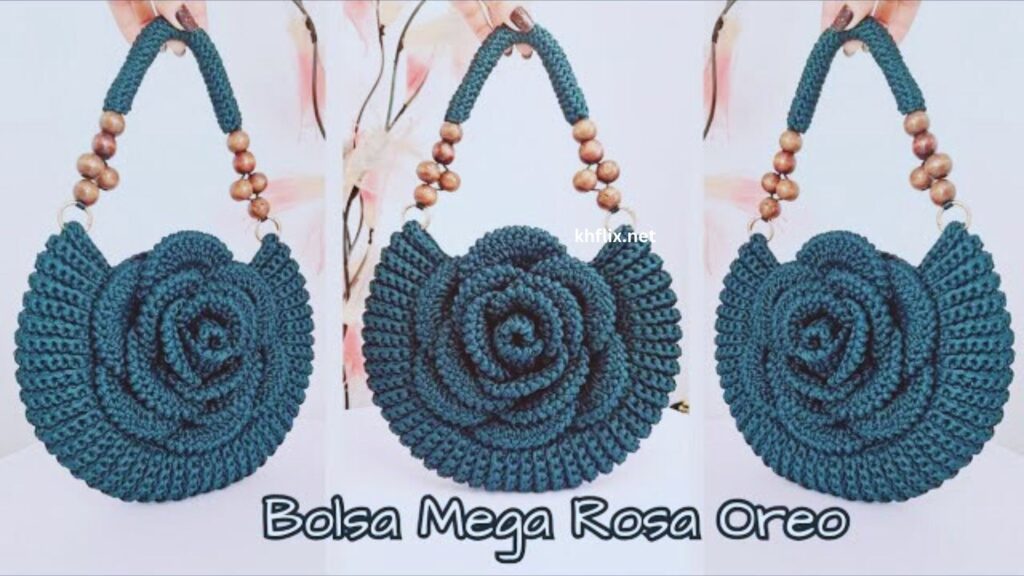
by Let’s embark on an exciting project: crocheting a large rose flower handbag! This isn’t just a bag with a rose appliqué; the bag itself will be shaped like a beautiful, blooming rose, making it a true statement piece. This project is a fantastic blend of functional accessory and artistic expression, guaranteed to turn heads.
How to Make a Large Rose Flower Crochet Handbag: Detailed Tutorial
This pattern will guide you through creating a stunning, three-dimensional rose-shaped handbag. We’ll build the bag from the center outwards, forming a sturdy base and then adding layers of petals to create the iconic rose shape and texture. This project requires patience and attention to detail but the result is incredibly rewarding.
Skill Level: Intermediate to Advanced
This project requires a good understanding of crochet basics and some experience with shaping and assembly. You’ll need to be comfortable with:
- Chain (ch): The basic foundation.
- Slip Stitch (sl st): For joining rounds and neatening.
- Single Crochet (sc): A compact stitch, good for stability.
- Half Double Crochet (hdc): A medium-height stitch.
- Double Crochet (dc): A taller stitch.
- Treble Crochet (tr): An even taller stitch (sometimes called triple crochet), crucial for large petals.
- Working in rounds: Crocheting in a circular motion.
- Increasing: Adding stitches to expand the bag and petals.
- Magic Ring (MR) or Adjustable Ring: Highly recommended for a tight center.
- Working into front loops only (FLO) and back loops only (BLO): Essential for creating distinct petal layers.
- Working into chain spaces and skipped stitches: For precise petal placement and shaping.
- Sewing: Using a yarn needle to assemble parts and secure petals.
- Stiffening (Optional but Recommended): Techniques to help the bag hold its shape.
Finished Handbag Dimensions (Approximate):
This bag is designed to be large and impactful. The finished diameter (across the widest part of the rose petals) will likely be around 12-16 inches (30-40 cm), with a depth of 3-5 inches (7.5-12.5 cm). The handle length will be customizable.
Materials You’ll Need:
- Yarn: This project uses a significant amount of yarn.
- Main Color (Rose Petals): Approximately 500-800 yards (450-730 meters) of Worsted Weight (Medium #4) or Aran Weight (Heavy Worsted #4/5) yarn.
- Recommended Fibers:
- Cotton or Cotton Blend: Offers excellent stitch definition, sturdiness, and holds shape well. It’s also durable.
- Acrylic: A more affordable option, comes in a vast array of colors, and is easy to care for. Choose a good quality, not-too-stretchy acrylic.
- Recommended Fibers:
- Accent Color (Optional – for deeper petal edges or inner bud): If you want a two-tone rose, factor in 100-200 yards (90-180 meters) of this.
- Green Yarn (for Leaves and Stem/Handle Base): Approximately 100-150 yards (90-135 meters) of Worsted Weight yarn.
- Lining Fabric (Optional but Recommended): About 0.5-1 yard (0.5-1 meter) of sturdy cotton or satin fabric for the interior.
- Main Color (Rose Petals): Approximately 500-800 yards (450-730 meters) of Worsted Weight (Medium #4) or Aran Weight (Heavy Worsted #4/5) yarn.
- Crochet Hook: Size H/5.0mm to J/6.0mm. The larger hook will create a softer fabric suitable for a bag. Adjust based on your yarn and desired firmness.
- Yarn Needle (Tapestry Needle): Essential for weaving in ends and, most critically, for assembling the rose and attaching components.
- Scissors: For cutting yarn and fabric.
- Stitch Markers: Very helpful for marking the start of rounds and corner stitches.
- Stiffening Agent (Optional but Highly Recommended):
- Fabric Stiffener (e.g., Mod Podge Fabric Stiffener, Stiffy): For a very rigid bag.
- Heavy Starch Spray: For moderate stiffness.
- Buckram or Plastic Canvas (for base/side shaping): If you want a super structured bag, you can cut these to fit the shape and sew them into the lining.
- Magnetic Snap Closure or Zipper (Optional): For securing the bag opening.
- Bag Handles (Optional): If you prefer non-crochet handles (e.g., wooden, bamboo, or metal rings).
- Sewing Needle and Thread (matching lining color): For attaching lining and closures.
Gauge:
Gauge isn’t critically strict for a bag of this nature, but consistent tension is paramount. It ensures your petals are uniform and your bag holds its shape well. A tighter tension will result in a firmer bag; a looser tension will result in a softer, more pliable bag.
Abbreviations Used in This Pattern:
- ch: chain
- sl st: slip stitch
- sc: single crochet
- hdc: half double crochet
- dc: double crochet
- tr: treble crochet
- dtr: double treble crochet (yarn over 3 times)
- st(s): stitch(es)
- sp: space
- ch-sp: chain space
- MR: Magic Ring
- FLO: Front Loop Only
- BLO: Back Loop Only
- rep: repeat
- FO: Fasten Off
Key Construction Concepts for a Rose Bag:
- Circular Base: The center of the rose and the bottom of the bag will start as a flat circle.
- Side Walls: We’ll build up the sides of the bag from this circular base.
- Layered Petals: The “rose” effect is achieved by crocheting multiple layers of petals directly onto the bag’s side walls, often by working into unused loops (like FLO/BLO) from previous rounds. These petals will be worked in sections and then strategically arranged and sewn.
- Sturdiness: Because it’s a bag, we’ll aim for a relatively dense fabric and may consider stiffening techniques.
Let’s Crochet Your Large Rose Flower Handbag!
We’ll divide this into sections: the bag base, the side walls, the petal layers, the leaves, and finally, assembly.
Part 1: The Bag Base (Main Color)
This forms the sturdy bottom of your rose bag. Use tight tension here.
- Start: Make a Magic Ring (MR).
- Alternative: Ch 4, sl st to first ch to form ring.
- Round 1: Ch 2 (does not count as st). 12 dc into MR. Pull tail to close. Sl st to first dc. [12 dc]
- Round 2: Ch 2. 2 dc in each st around. Sl st to first dc. [24 dc]
- Round 3: Ch 2. (1 dc in next st, 2 dc in next st) rep 12 times. Sl st to first dc. [36 dc]
- Round 4: Ch 2. (1 dc in next 2 sts, 2 dc in next st) rep 12 times. Sl st to first dc. [48 dc]
- Round 5: Ch 2. (1 dc in next 3 sts, 2 dc in next st) rep 12 times. Sl st to first dc. [60 dc]
- Round 6: Ch 2. (1 dc in next 4 sts, 2 dc in next st) rep 12 times. Sl st to first dc. [72 dc]
- Round 7: Ch 2. (1 dc in next 5 sts, 2 dc in next st) rep 12 times. Sl st to first dc. [84 dc]
- Self-Correction: If your base is starting to ripple, you’re increasing too much. If it’s cupping, you’re not increasing enough. Adjust by adding or removing increases in a round. A standard flat circle increases by 12 stitches per round when starting with 12 dc.
Part 2: Building the Bag Side Walls (Main Color)
This section creates the height of your bag. We’ll work into the BLO of the first round to create a defined edge for the bag’s base.
- Round 8: Ch 1 (does not count as st). Work 1 sc in the BLO (Back Loop Only) of each stitch around. Sl st to first sc. [84 sc]
- This round creates a slight ridge, defining the bottom edge of your bag and making the side walls stand up.
- Round 9-12 (or until desired height): Ch 1. Work 1 sc in each stitch around. Sl st to first sc. [84 sc]
- The number of rounds here determines your bag’s depth. 4-6 rounds of sc typically work well for a medium depth.
- Do NOT Fasten off.
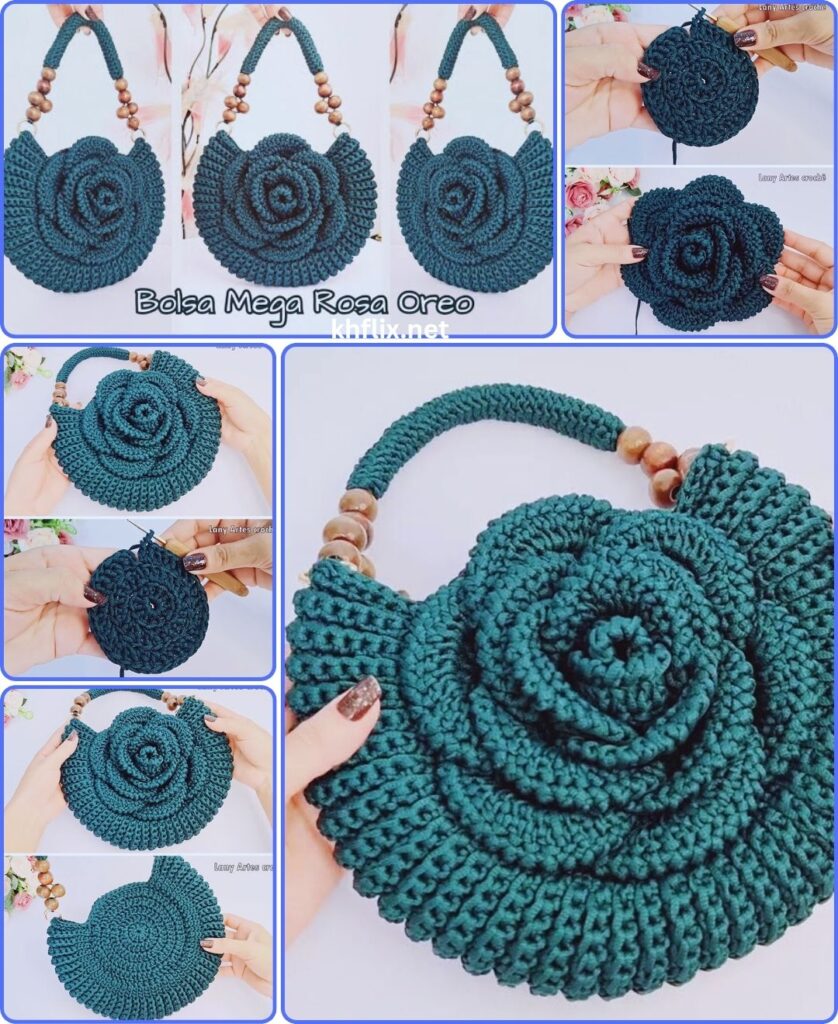
Part 3: Crocheting the Petal Layers (Main Color, or Main Color + Accent Color)
This is the most creative and intricate part! We’ll create separate petal strips that will be attached and layered. This method gives more control over the 3D effect than trying to crochet petals directly onto the bag rounds.
- Strategy: We’ll make a series of long, graduated “petal strips.” Each strip will have a base row and then a petal row. These strips will then be sewn onto the bag’s side walls, starting from the top rim and working downwards to cover the side walls and integrate with the base.
Petal Strip Pattern (Make multiple of each size):
- Start each strip with a chain that’s a multiple of 4 + 1 (for turning). Adjust chain length for desired petal width.
- Row 1 (Foundation): Sc in 2nd ch from hook and in each ch across. Ch 1, turn.
- Row 2 (Petals):
- (Sl st in first sc, ch 2, 2 dc in next sc, ch 2, sl st in next sc, sk 1 sc) across the row.
- FO, leave a long tail for sewing.
Example Petal Strip Sizes (Adjust as needed):
- Inner Petals (Smallest – approx. 5-7 petals per strip):
- Use Main Color (or Accent Color).
- Ch 30.
- Row 1: Sc in 2nd ch from hook and in each ch across. [29 sc] Ch 1, turn.
- Row 2: (Sl st in first sc, ch 2, 2 dc in next sc, ch 2, sl st in next sc, sk 1 sc) rep 7 times. Sl st in last sc. [7 petals]
- Make 2-3 of these strips.
- Middle Petals (Medium – approx. 6-8 petals per strip):
- Use Main Color.
- Ch 40.
- Row 1: Sc in 2nd ch from hook and in each ch across. [39 sc] Ch 1, turn.
- Row 2: (Sl st in first sc, ch 3, 1 dc, 1 tr, 1 dc in next sc, ch 3, sl st in next sc, sk 1 sc) rep 8 times. Sl st in last sc. [8 petals]
- Make 3-4 of these strips.
- Outer Petals (Largest – approx. 7-9 petals per strip):
- Use Main Color.
- Ch 50.
- Row 1: Sc in 2nd ch from hook and in each ch across. [49 sc] Ch 1, turn.
- Row 2: (Sl st in first sc, ch 3, 2 tr, 1 dtr, 2 tr in next sc, ch 3, sl st in next sc, sk 1 sc) rep 9 times. Sl st in last sc. [9 petals]
- Make 4-5 of these strips.
Part 4: Assembling the Rose Handbag
This is where your creation truly comes to life!
- Prepare Bag Opening:
- From your current position (end of Round 12 of side wall), ch 1. Work 1 sc in each st around for 1-2 more rounds to create a neat opening edge. Sl st to join. FO.
- Attach Inner Petals:
- Take your smallest petal strips. Starting from the center of the bag’s opening (or slightly offset if you want a natural swirl), begin stitching the base of the first small petal strip onto the very top edge of the bag (Round 12/13).
- Curl the strip as you go, spiraling it tightly to form the rose’s bud. Use the long tails and your yarn needle to securely sew the base of the strip to the bag opening and to itself, ensuring it holds its tight, bud-like shape.
- Attach the second (and third, if applicable) small petal strip around the first, slightly overlapping, creating the next layer of inner petals. Sew securely.
- Attach Middle Petals:
- Take your medium petal strips. Begin attaching them around the inner petals, slightly lower down on the bag’s side walls. Overlap them nicely to create a full, lush look.
- Use your yarn needle to stitch the base of these strips to the side wall of the bag. You’ll be stitching horizontally along the side of the bag, effectively covering the sc rows you made earlier.
- Allow the petal tips to naturally cup outwards. Continue until all medium strips are used.
- Attach Outer Petals:
- Take your largest petal strips. Attach these around the outermost edge of the bag’s side walls, extending slightly onto the base if needed to achieve a full rose look.
- Sew the bases securely to the bag. These petals will be the most prominent and should have the most natural curl.
- Secure All Petals:
- Once all strips are attached, go back with your yarn needle. For any petals that seem too floppy or don’t hold their shape, add a few discreet stitches at their base or even a tiny stitch connecting them to an adjacent petal to give them stability and the desired curl. This is crucial for the “eye-catching” 3D effect.
Part 5: Crocheting the Leaves and Handle (Green Yarn)
Leaves (Make 2-3):
- With green yarn, Ch 15.
- Sl st in 2nd ch from hook. Sc in next ch. Hdc in next 2 chs. Dc in next 6 chs. Hdc in next 2 chs. Sc in next ch. Sl st in last ch.
- Ch 2 (to create a point). Now work down the other side of the starting chain: Sl st in next ch (base of first sl st). Sc in next ch. Hdc in next 2 chs. Dc in next 6 chs. Hdc in next 2 chs. Sc in next ch. Sl st in last ch.
- FO, leaving a long tail for sewing.
Handle (Make 1 long strip):
- With green yarn, Ch 100-120 (adjust for desired handle length).
- Sc in 2nd ch from hook and in each ch across. [99-119 sc]
- Ch 1, turn. Sc in each st across.
- Repeat Row 2 for 2-3 more rows, to get a sturdy, flat handle.
- FO, leaving long tails at both ends for sewing.
Part 6: Final Assembly & Stiffening
- Attach Leaves: Position the crocheted leaves on the back or side of the rose where they would naturally emerge from the stem. Use your yarn needle to securely stitch them to the base of the bag and the lower petals.
- Attach Handle:
- Determine the placement of your handle. Ideally, it should attach to the “stem” area of the rose (the lower back/sides).
- Securely stitch each end of the crocheted handle to the side walls of the bag, going through multiple layers of stitches for durability. Reinforce these attachment points with several passes of your yarn needle.
- Weave in All Remaining Ends: Double-check every single yarn tail and weave them in securely on the inside of the bag.
- Optional: Stiffening the Bag:
- Crucial Step for Shape Retention! For a large bag like this, some form of stiffening is almost essential unless you prefer a very slouchy look.
- Method 1 (Fabric Stiffener): Prepare your fabric stiffener according to package directions. Apply it generously to the entire outside of the crocheted bag, focusing on the petals and base. Gently shape the petals as desired while wet. Allow to dry completely (this can take 24-48 hours). Reapply if more stiffness is desired.
- Method 2 (Spray Starch): For a lighter stiffening, liberally spray the entire bag with heavy-duty spray starch. Shape and allow to dry. Repeat for more stiffness.
- Method 3 (Buckram/Plastic Canvas Lining): If you desire extreme rigidity, cut buckram or plastic canvas to fit the circular base and the side walls of your bag. You’ll then sew these into a fabric lining.
- Optional: Add Lining and Closure:
- Lining: Measure and cut your chosen lining fabric to match the inside dimensions of your bag. Sew it into a bag shape (circular bottom, cylindrical sides). Hand-stitch or machine-stitch the lining to the inside rim of your crocheted bag. This protects your belongings and helps maintain the bag’s shape.
- Closure: Sew a magnetic snap closure just inside the bag’s opening, or install a zipper if desired.
You have now created a truly extraordinary and eye-catching large rose flower crochet handbag! This is a labor of love, a unique accessory that showcases your incredible crochet skills. Enjoy carrying your blooming masterpiece!