 by
by Here’s a detailed, long-form tutorial on how to crochet a Granny Square Tote Bag — a stylish, functional project that blends classic technique with modern fashion.
Whether you’re a beginner looking to master granny squares or a seasoned crocheter looking to try a fun and practical project, this step-by-step granny square tote bag tutorial is the perfect guide for you.
🧶 How to Crochet a Granny Square Tote Bag – Easy Step-by-Step Tutorial (Long Article)
Granny squares have been a beloved part of crochet for generations. Their versatility, simplicity, and vibrant visual appeal make them the foundation for countless creative projects. In this guide, we’ll show you how to transform basic granny squares into a stylish and functional tote bag that’s perfect for daily use, beach outings, or weekend shopping.
With this granny square tote bag tutorial, you’ll learn how to:
- Crochet classic granny squares
- Join them together neatly
- Add a lining (optional but recommended)
- Create strong, stylish handles
- Assemble a modern tote from vintage inspiration
✨ Why Make a Granny Square Tote Bag?
- ✅ Beginner-friendly & easy to customize
- ✅ Uses small yarn amounts – great stash buster
- ✅ Trendy and perfect for everyday use
- ✅ No complicated shaping
- ✅ A fun way to practice color coordination
🧺 Materials You’ll Need
Here’s everything you need to make your crochet granny square tote bag:
| Item | Description |
|---|---|
| Yarn | Worsted weight (Category 4) cotton or acrylic yarn in multiple colors |
| Crochet Hook | 5.0 mm (H-8) or size appropriate for your yarn |
| Tapestry Needle | For weaving in ends and sewing pieces |
| Scissors | For trimming yarn |
| Stitch Markers | Optional but helpful when assembling |
| Fabric (Optional) | For lining the bag |
| Button / Magnetic Snap (Optional) | For closure |
🧵 Yarn suggestion: Use sturdy yarn like cotton (e.g., Lily Sugar’n Cream) for a durable, long-lasting tote.
🧵 Stitches Used (US Terminology)
| Abbreviation | Stitch Name |
|---|---|
| ch | Chain |
| sl st | Slip Stitch |
| sc | Single Crochet |
| dc | Double Crochet |
| sp | Space |
📐 Finished Size (Approximate)
- Bag body: 12″ x 12″
- Handles: 20″ long each (adjustable)
- Total depth: ~3.5″ if joined with gusset/sides
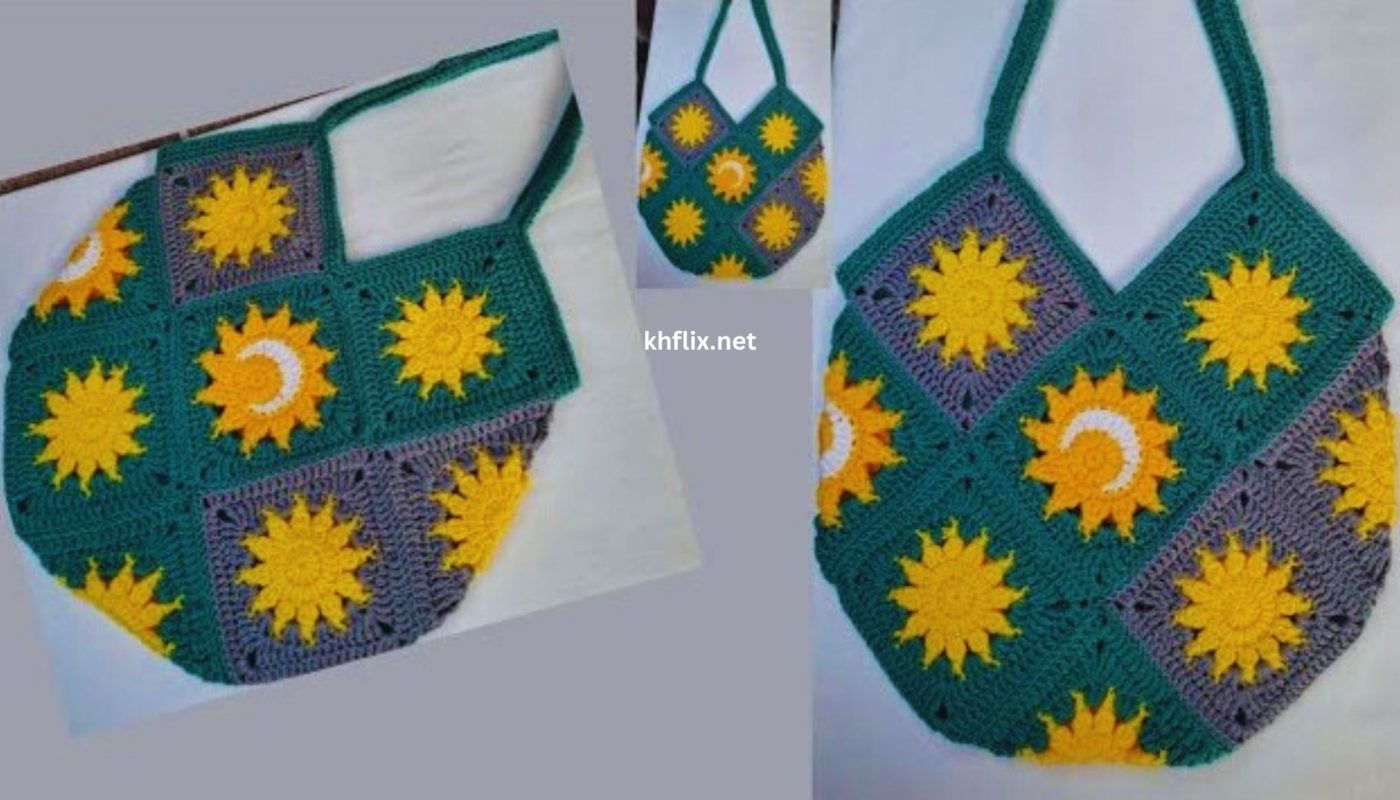
🧶 How Many Granny Squares Do I Need?
For this tote design:
- Make 13–17 granny squares, depending on size and layout
- 9 squares for front and back (3×3 layout)
- 4–8 squares for side panels or gussets (optional)
- 2 strips or 2 squares for bottom panel (optional)
Granny squares can be 4 or 5 rounds wide (approx. 4″x4″ each).
🪡 Step-by-Step Crochet Granny Square Tote Bag Tutorial
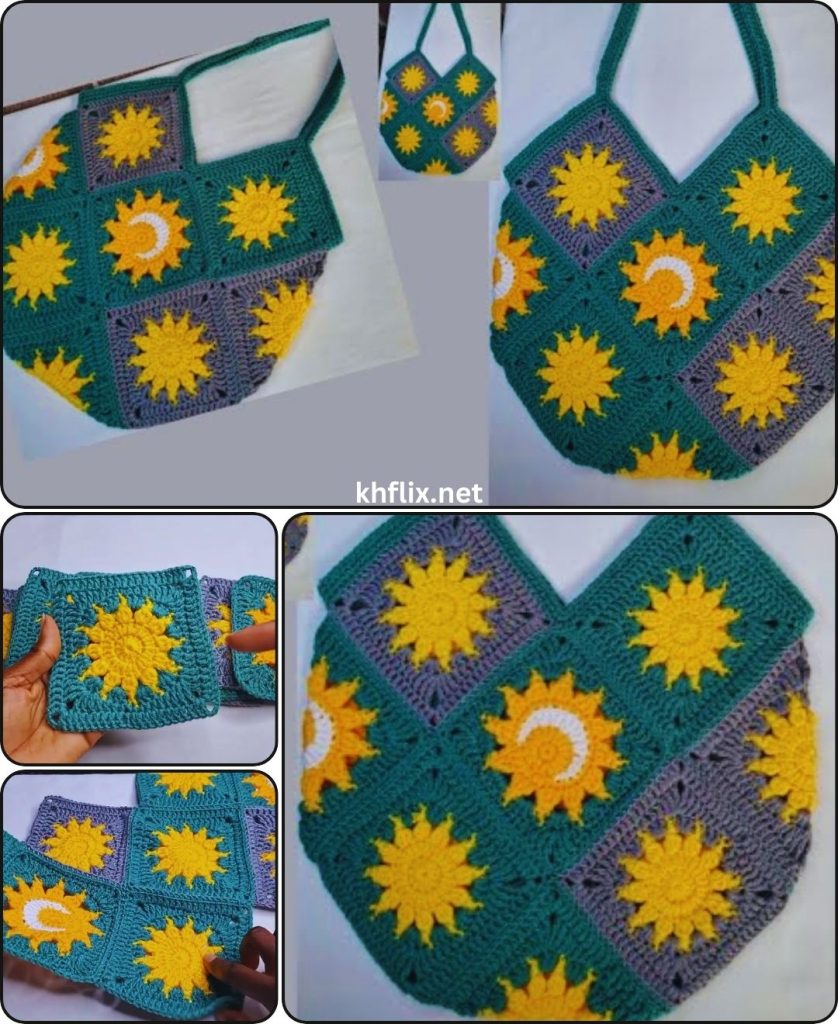
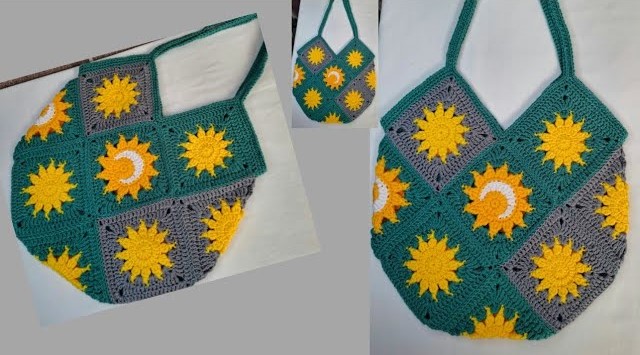
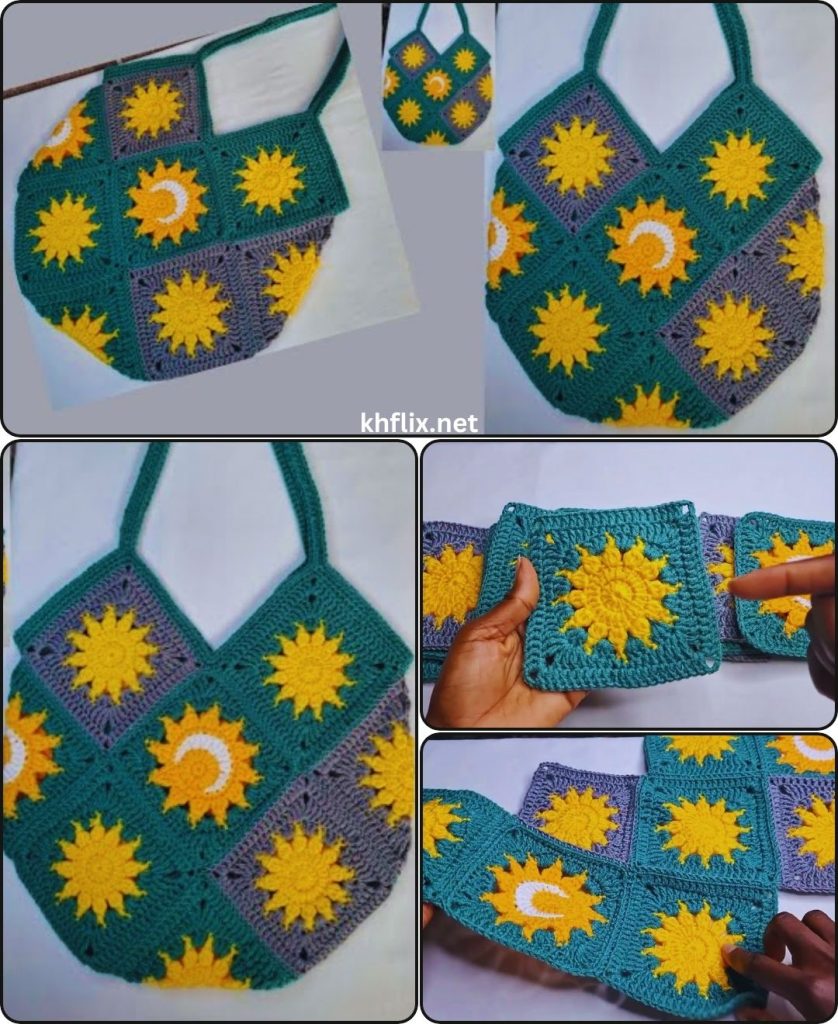
🔶 STEP 1: Crochet the Classic Granny Squares
Let’s make one classic 4-round granny square. You’ll repeat this to make all needed squares.
🧵 Pattern for One Classic Granny Square:
Round 1:
- Make a magic ring.
- Ch 3 (counts as dc), 2 dc in ring, ch 2,
- 3 dc, ch 2 repeat 3 more times (4 dc clusters total),
- Sl st to top of ch 3 to close. (4 corners)
Round 2:
- Sl st to next ch-2 sp, ch 3, 2 dc in same sp, ch 2, 3 dc in same sp (corner made)
- Ch 1, (3 dc, ch 2, 3 dc) in next ch-2 sp repeat 3 times
- Ch 1, sl st to top of ch 3 to join.
Round 3:
- Sl st to corner ch-2 space.
- Ch 3, 2 dc in same space, ch 2, 3 dc (corner)
- Ch 1, 3 dc in next ch-1 sp, ch 1
- Repeat around, working corners as (3 dc, ch 2, 3 dc), sides as (3 dc),
- Sl st to join.
Round 4:
- Repeat Round 3 logic: work corners and sides as before.
- Fasten off and weave in ends.
✨ Repeat to make 13–17 squares depending on your layout.
🔷 STEP 2: Arrange Your Squares
Lay out your granny squares on a flat surface to decide your layout:
🧩 Example Layout:
- Front: 3×3 square grid = 9 squares
- Back: 3×3 grid = 9 squares
- Sides (optional): 1×3 strips on each side
- Bottom (optional): 1×3 strip or single panel
🧠 TIP: Take a photo of your layout for reference before joining.
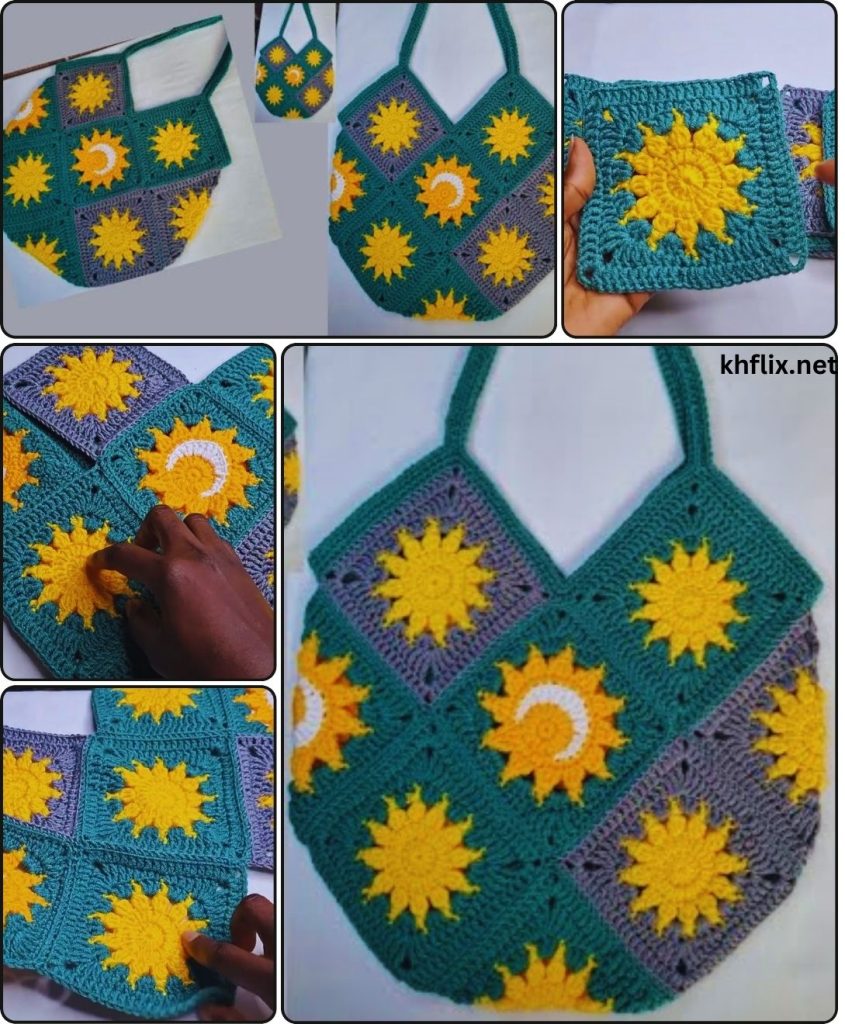
🔗 STEP 3: Join the Granny Squares
There are multiple ways to join granny squares. Choose your favorite method:
🧶 Option A: Join-as-you-go (Advanced)
- Join the last round of each square to others by slip stitching into adjacent squares as you crochet.
🧵 Option B: Whip Stitch (Beginner-Friendly)
- Place squares right sides together.
- Using a tapestry needle and matching yarn, whip stitch through the outer loops only.
- Join row by row, then join the rows together.
- Weave in all ends.
🪢 Option C: Single Crochet Join (Decorative Ridge)
- Place wrong sides together and sc across the seams.
- Creates a visible “ridge” that can be stylish.
🧳 STEP 4: Assemble the Bag Structure
After joining the front, back, sides (optional), and bottom (optional), you’ll sew or crochet them together:
- Join front and back panels to side/bottom strip using sc or whip stitch.
- Seam all four sides, forming a box or tote shape.
✅ If skipping side/bottom panels, just join front and back with a sc seam down both sides and across the bottom for a flat tote.
👜 STEP 5: Add the Handles
Option A: Simple Crochet Handles
Handle Pattern:
- Ch 80–100 (for shoulder straps)
- Turn, sc in 2nd ch from hook and across.
- Optional: Repeat 2 more rows for thicker straps.
- Sew ends to the inside top of the bag.
Option B: Rope or Leather Handles
- Attach using metal rings or sew directly onto the bag.
- Reinforce with stitches or buttons for durability.
📌 TIP: Use stitch markers to test placement before sewing.
🧵 STEP 6: Optional – Add a Liner
Adding a fabric liner gives the bag shape and prevents items from poking through.
How to Add a Simple Liner:
- Lay the bag flat and measure height and width.
- Cut 2 fabric pieces that size + 0.5” seam allowance.
- Sew 3 sides (leaving the top open).
- Insert into the bag and hand-sew or machine-sew to top edge.
🧵 TIP: Use interfacing between fabric layers for added structure.
✨ Optional Embellishments
- 🧶 Add tassels or pom-poms to the handles
- 🌸 Sew on crocheted flowers, initials, or patches
- 🧷 Use decorative buttons or a snap closure
- 🎨 Use color blocking or ombré yarns for visual interest
🧼 Care Instructions
- Hand wash in cold water, lay flat to dry
- Avoid overstretching if the bag is unlined
- Line with fabric to add strength and prevent distortion
✅ Summary Table
| Step | Description |
|---|---|
| Step 1 | Crochet 13–17 granny squares |
| Step 2 | Arrange layout (3×3 grid or more) |
| Step 3 | Join squares using whip stitch, SC, or join-as-you-go |
| Step 4 | Assemble bag panels |
| Step 5 | Add crochet or ready-made handles |
| Step 6 | (Optional) Sew in a liner |
| Final Touches | Add closures, decorations, or labels |
🎉 Final Thoughts
Crocheting a granny square tote bag is a rewarding, beginner-friendly project that allows you to mix tradition with trend. It’s not only a great way to use up leftover yarn, but it also lets you showcase your creativity with color combinations, textures, and styling.
Once you’ve mastered the classic granny square tote, you can move on to experimenting with:
- 🌈 Different square types (solid, sunburst, flower)
- 🧳 Bigger or smaller bags
- 🎒 Backpacks and crossbody styles
- 🧶 Market bags with mesh squares