 by
by Here’s a detailed, long-form tutorial on how to crochet granny square slippers — a cozy, beginner-friendly project that combines classic crochet techniques with practical comfort.
🧶 How to Crochet Granny Square Slippers – Easy Crochet Slippers Tutorial (Long, Step-by-Step Guide)
There’s something wonderfully nostalgic and cozy about granny squares. While they’re commonly used in blankets and bags, today we’re putting a fun twist on them: Granny Square Slippers! These slippers are easy to make, endlessly customizable, and perfect for lounging around the house or gifting to a loved one.
This detailed guide walks you through how to make crochet granny square slippers step by step — from creating the squares, joining them together, to shaping them into snug, comfy footwear.
👣 Why You’ll Love These Slippers
- ✅ Perfect beginner crochet project
- ✅ Works up quickly (1–2 hours per slipper!)
- ✅ Uses scrap yarn or leftovers
- ✅ Comfortable, warm, and washable
- ✅ Easily adjustable for all foot sizes
🧺 Materials You’ll Need
| Item | Description |
|---|---|
| Yarn | Worsted weight yarn (Category 4) – Cotton, wool, or acrylic |
| Hook | 5.0 mm (H-8) crochet hook |
| Tapestry Needle | For sewing squares together and weaving in ends |
| Scissors | For trimming yarn |
| Stitch Markers | Optional, for counting or placement |
| Sole padding (optional) | Felt or leather if you want anti-slip base |
✅ Yarn tip: Cotton and wool yarns give better grip and warmth than slippery acrylic blends.
🧵 Crochet Stitches Used (US Terms)
| Abbreviation | Stitch Name |
|---|---|
| ch | Chain |
| sl st | Slip Stitch |
| sc | Single Crochet |
| dc | Double Crochet |
| sp | Space |
| st(s) | Stitch(es) |
📐 Finished Size (Adjustable)
You can easily make these slippers in any size by:
- Changing the number of rounds in your granny squares
- Using a larger or smaller hook
- Adjusting the number of squares used
🪡 How Many Squares Do I Need?
The basic adult pair of granny square slippers typically uses 6 squares per slipper:
- 1 square for the toe/top
- 2 squares for the sides
- 1 square for the heel
- 2 squares for the sole
So you’ll need 12 squares in total for a pair.
👣 For small kids, you may only need 5 squares per slipper.
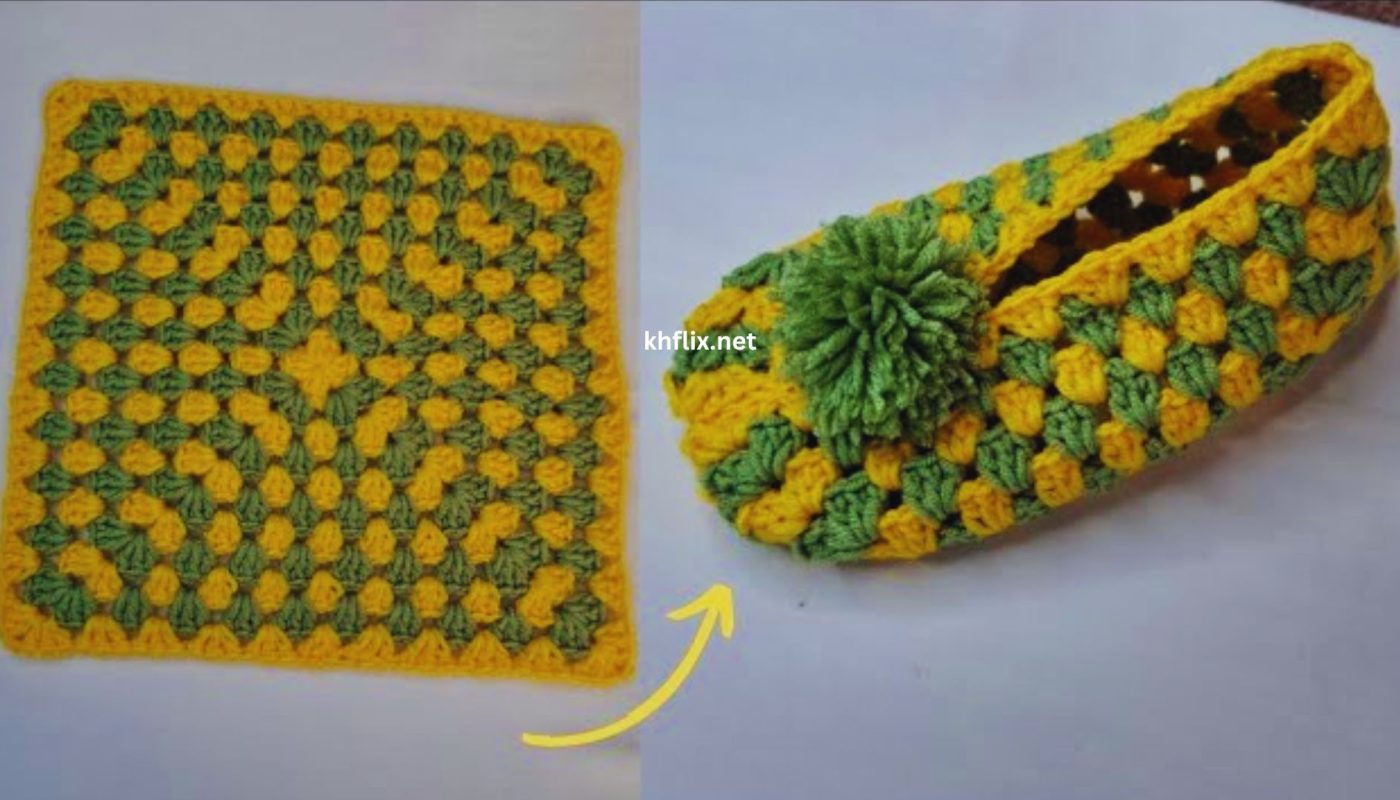
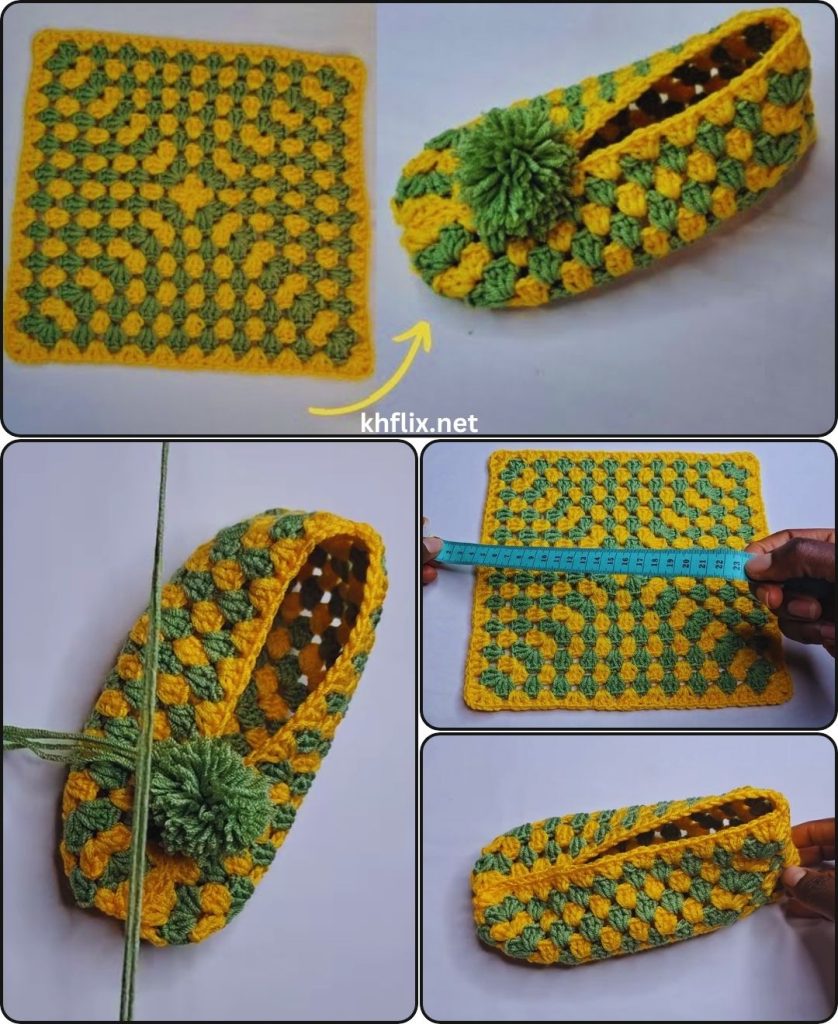
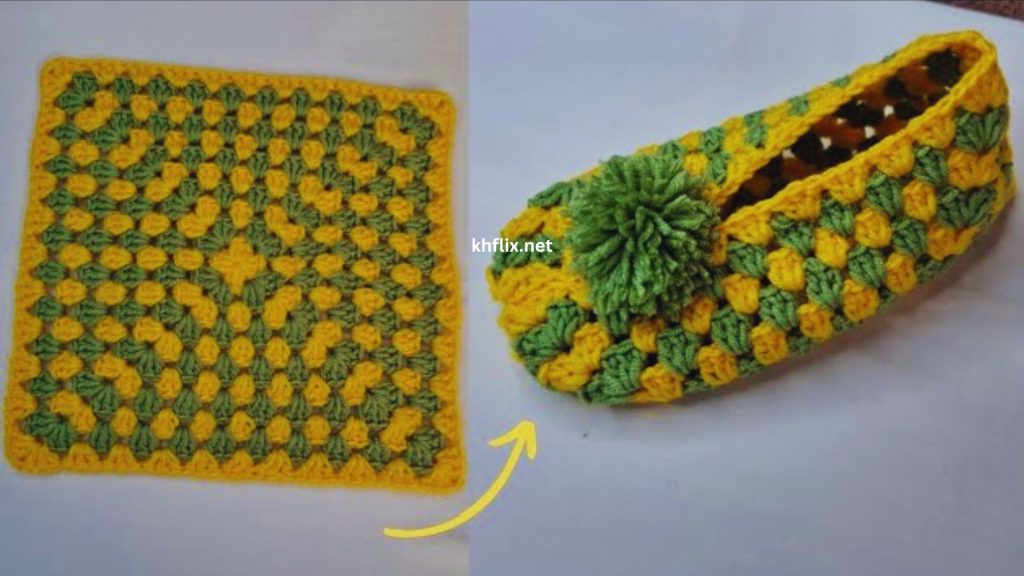
🧶 PART 1: Make the Granny Squares
Let’s start by making the classic granny squares.
🔷 Basic Granny Square Pattern (4 Rounds)
Round 1:
- Start with a magic ring or ch 4 and sl st to form a ring.
- Ch 3 (counts as dc), 2 dc into the ring, ch 2
- (3 dc, ch 2) repeat 3 more times
- Sl st to top of ch 3 to join. (You should have 4 corners)
Round 2:
- Sl st to the next corner space. Ch 3, 2 dc, ch 2, 3 dc in the same space.
- In the next 3 corners: (3 dc, ch 2, 3 dc)
- Sl st to join.
Round 3:
- In each corner: (3 dc, ch 2, 3 dc)
- In each side space: (3 dc)
- Repeat all the way around and sl st to join.
Round 4:
- Repeat the same pattern as Round 3. You’ll now have a larger square (~4” x 4”).
✨ Make 12 squares total (or more for larger feet).
🎨 Color Ideas
- Use the same color for a minimalist look
- Make each square different for a patchwork style
- Use a contrasting border color for unity
- Try ombré or gradient yarn for a beautiful color fade
🧩 PART 2: Layout & Assembly Plan
Here’s the layout using 6 squares per slipper:
[ S ] - Side
[ T ] - Toe/Top
[ H ] - Heel
[ L ] - Sole

   [S]
[H][T][S]
   [L]
   [L]
🔗 PART 3: Join the Squares
Now you’ll sew or crochet the squares together to form the slipper.
🪢 Joining Methods:
- Whip Stitch (easy for beginners)
- Place two squares right sides together
- Use the tapestry needle and yarn to sew through the back loops only
- Single Crochet Join
- Hold two squares wrong sides together and sc through both edges
- Creates a ridge, which can be decorative
- Slip Stitch Join
- Sl st through both layers to create a flat seam
👞 PART 4: Assembling the Slipper
➤ Step-by-Step Assembly:
1. Join the toe square to two side squares
- The toe square (T) will sit at the top/front of the foot
- Sew or crochet the side squares (S) to the left and right edges of the toe square
2. Attach the heel square (H) to the back ends of the side squares
- This will wrap around the heel of your foot
3. Attach two sole squares (L)
- One connects under the toe/ball of the foot
- The second goes behind it under the arch and heel
- Sew all the sole squares to the bottom edges of the toe, side, and heel squares
✨ Now your slipper is fully formed!
🧵 PART 5: Finishing Touches
✅ Secure all seams
- Reinforce high-stress joins with extra stitching
✅ Weave in all ends
- Use the tapestry needle to hide ends neatly inside seams
✅ Add a border (optional)
- Work a round of sc or reverse sc around the top opening for a cleaner look
✅ Add sole padding (optional)
- Cut felt, fleece, or rubber to shape and sew to the bottom
- Prevents slipping and adds warmth

🔧 Size Adjustments
| Foot Size | Granny Square Rounds | Notes |
|---|---|---|
| Small (kids) | 3 rounds | Use finer yarn or smaller hook |
| Medium (women) | 4 rounds | Standard size |
| Large (men) | 5 rounds | Or use 6 squares and add sole padding |
🧼 Care Instructions
- Hand wash or machine wash on gentle
- Use a delicates bag to prevent stretching
- Lay flat to dry
- Avoid bleach or high heat
🌟 Customization Ideas
- Add a button or bow to the top
- Crochet flower appliqués onto the toe square
- Add fur yarn around the top for a slipper-boot style
- Use contrasting joins for patchwork effect
- Add a drawstring cuff to convert into sock-style slippers
✅ Quick Recap
| Step | Description |
|---|---|
| Step 1 | Crochet 12 granny squares (4–5 rounds each) |
| Step 2 | Lay out 6 squares per slipper in the toe, side, heel, and sole positions |
| Step 3 | Join squares using whip stitch or crochet join |
| Step 4 | Assemble into slipper shape and seam securely |
| Step 5 | Finish with edging, sole, or decoration |
🎁 Perfect for Gifting!
These cozy granny square slippers make perfect handmade gifts for:
- 🧓 Grandparents
- 🎂 Birthdays
- 🎄 Holidays
- 🎁 Craft fairs
- 🏡 Housewarming baskets
Wrap them with a handmade tag and you’ve got a warm, heartfelt present anyone would love.
🎉 Final Thoughts
Crocheting granny square slippers is a great way to blend timeless crochet tradition with modern functionality. They’re fast, fun, and full of possibilities for color and customization. Whether you’re making your first pair or your fiftieth, this is a project that’s always satisfying and always appreciated.
Once you’ve made one pair, try experimenting with:
- High-top booties
- Slipper-socks with ribbed cuffs
- Different square styles (solid, flower center, starburst)
- Leftover yarn color combos