 by
by Of course. Here is a detailed, long-form tutorial on how to crochet a durable and stylish tote bag using only the fundamental single crochet stitch. This guide is perfect for beginners or anyone looking for a simple, meditative, and highly rewarding project.
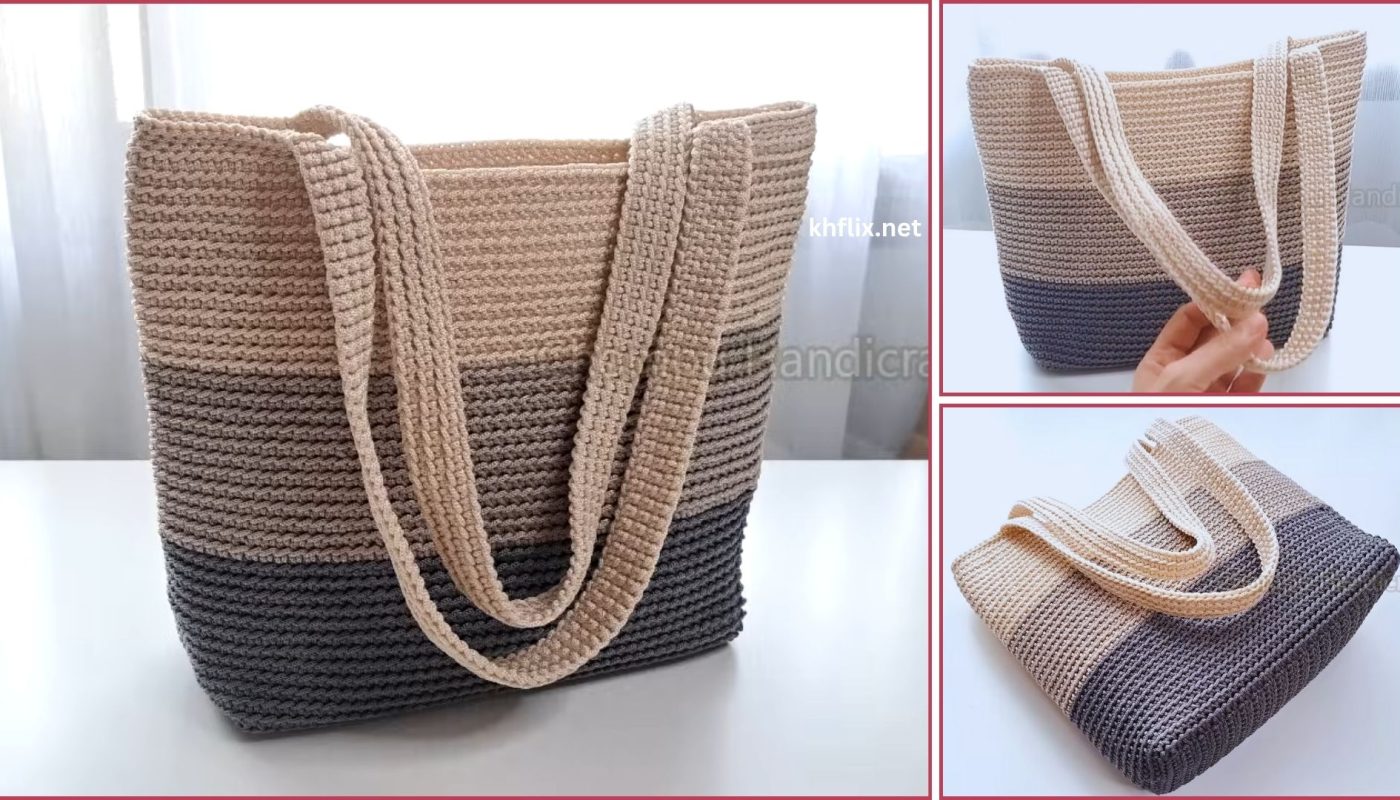
How to Crochet the Perfect Tote Bag with Just One Stitch: A Beginner’s Step-by-Step Tutorial
In the world of crochet, amidst hundreds of complex and decorative stitches, there is one that stands as the unshakable foundation: the Single Crochet. It is the humble workhorse, the unsung hero that creates a fabric of unparalleled strength and simple beauty. It is, without a doubt, the perfect stitch for creating a durable, functional, and timeless tote bag.
This tutorial is a celebration of that simplicity. We will guide you, step by step, through the process of creating a beautiful and incredibly sturdy tote bag using only the single crochet stitch. You will learn foundational techniques for construction, how to create seamless integrated straps (with no sewing required!), and how to finish your project like a pro. Prepare to create a bag you’ll be proud to carry everywhere, made with your own two hands.
Part 1: The Beauty of Simplicity – Why Single Crochet is King for Bags
Before we begin, let’s appreciate why this basic stitch is the absolute best choice for a project like this.
- Unmatched Durability: The single crochet (
$sc$) creates a dense, tight-knit fabric. Each stitch interlocks closely with its neighbors, resulting in a material that is strong, resilient, and resistant to stretching. - No Gaps, No Worries: Unlike looser, taller stitches, the
$sc$fabric has minimal gaps. This means your keys, pens, and smaller items will stay securely inside your bag, not poking through or falling out. - A Classic Woven Look: When worked consistently, single crochet creates a gorgeous, subtle texture that resembles a classic woven fabric. It’s elegant, understated, and never goes out of style.
- A Mindful Making Process: The repetitive, simple rhythm of the single crochet is incredibly meditative. It’s the perfect project to work on while watching a movie or listening to a podcast, allowing you to relax while creating something beautiful and practical.
Part 2: Your Project Blueprint – Materials & Foundation
Let’s gather your supplies. For this project, quality materials will ensure a long-lasting final product.
Materials & Tools
- Yarn: Worsted weight (Category 4) cotton yarn. 100% cotton or a cotton-blend is highly recommended. It’s strong, washable, and holds its shape exceptionally well. You will need approximately 400 yards (365 meters) for a solid-colored bag. We will be using a lovely Sage Green for this tutorial.
- Crochet Hook: A 5.0mm (H-8) crochet hook.
- Stitch Marker: Essential for tracking the beginning of your rounds.
- Tapestry Needle: For a clean, professional finish when weaving in your two ends.
- Scissors: A sharp pair for cutting yarn.
Foundation Knowledge
- Skill Level: Beginner
- Terminology: This pattern is written in standard US crochet terms.
- Gauge: 15
$sc$stitches x 17 rows = 4×4 inches (10×10 cm). Gauge isn’t critical, but achieving a tight fabric is the goal. If your stitches look loose, consider going down a hook size. - Finished Dimensions: Approximately 14 inches (35.5 cm) wide and 12.5 inches (32 cm) tall (excluding straps).
Abbreviations
$ch$= chain$st(s)$= stitch(es)$sc$= single crochet$sl\ st$= slip stitch
Part 3: The Step-by-Step Single Crochet Tote Pattern
Let’s begin the rewarding process of bringing your tote bag to life.
Step A: The Solid Base (Working in Rows)
We start by creating a sturdy, flat rectangle that will serve as the bottom of our bag.
Using your Sage Green yarn:
- Foundation:
$ch$41. - Row 1:
$sc$in the 2nd$ch$from the hook, and in each$ch$across.$ch$1, turn. (40 sts) - Row 2:
$sc$in each$st$across.$ch$1, turn. (40 sts) - Rows 3 – 14: Repeat Row 2.
At the end of Row 14, you will have a solid rectangle of single crochet fabric. Do not fasten off. From here, we will begin working in rounds to build up the walls of the bag.
Step B: Building the Walls (Working in Rounds)
Round 1 (Set-up Round): Now we will work our way around the entire perimeter of the rectangle. $ch$ 1.
- Work 1
$sc$in each of the 40 stitches along the last row you just made. - Work 14
$sc$evenly down the short side (one$sc$for each row-end). - Work 1
$sc$in each of the 40 stitches along the bottom foundation chain. - Work 14
$sc$evenly up the other short side. You will have a total of 108 stitches (40 + 14 + 40 + 14). Do not join the round. We will now work in a continuous spiral. Place your stitch marker in the very last stitch you made to mark the end of the round.
Round 2 and Onwards:
- Work 1
$sc$in each stitch around. - After you complete a full round, simply move your stitch marker up to the last stitch you just made.
- Continue working in this spiral for approximately 48 rounds, or until the body of your bag measures about 11 inches (28 cm) tall from the base.
Working in a spiral creates a seamless body with no joining line, giving your bag a very clean, professional look.
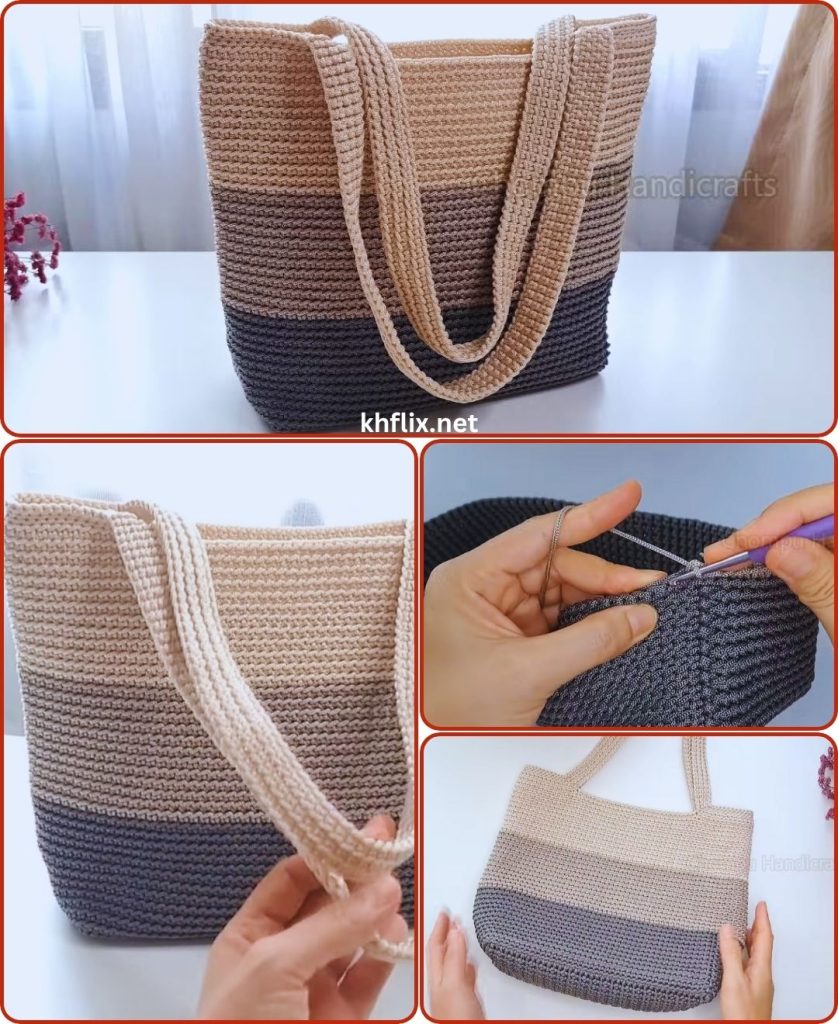
Step C: Creating the Seamless Straps (The Magic Step!)
This technique creates straps that are fully integrated into the body of the bag, making them incredibly strong.
- Preparation: Finish your last round of the bag body. Lay the bag completely flat. Your stitch marker should be at one of the side “seams.” You have 108 stitches total, meaning 54 stitches on the front and 54 stitches on the back.
- Marking for Straps:
- On the front side, count in 15 stitches from the right edge and place a temporary marker.
- From that marker, count over 24 stitches and place another temporary marker. The 24 stitches between these markers is where your strap will attach.
- Flip the bag over and do the exact same thing on the back side.
Round 49 (Strap Creation Round):
$sc$in each stitch until you reach your first marker.$ch$80 (or your desired strap length). Be careful not to twist your chain.- Skip all 24 stitches between your markers.
$sc$into the stitch immediately after the second marker.- Continue to
$sc$across the side and front of the bag until you reach the next marker on the other side. $ch$80 for the second strap.- Skip the 24 stitches between the markers.
$sc$into the stitch immediately after the second marker.$sc$until you reach the end of the round (your main stitch marker).
Rounds 50 – 54 (Building the Straps): Now, you will simply continue crocheting in the round as before. When you reach the chain stitches of the strap, work 1 $sc$ into each chain.
- Work 1
$sc$in each$sc$of the bag body and 1$sc$in each$ch$of the straps. - Continue this for about 5 rounds. This will create wide, flat, and very comfortable straps that are a seamless part of the bag.
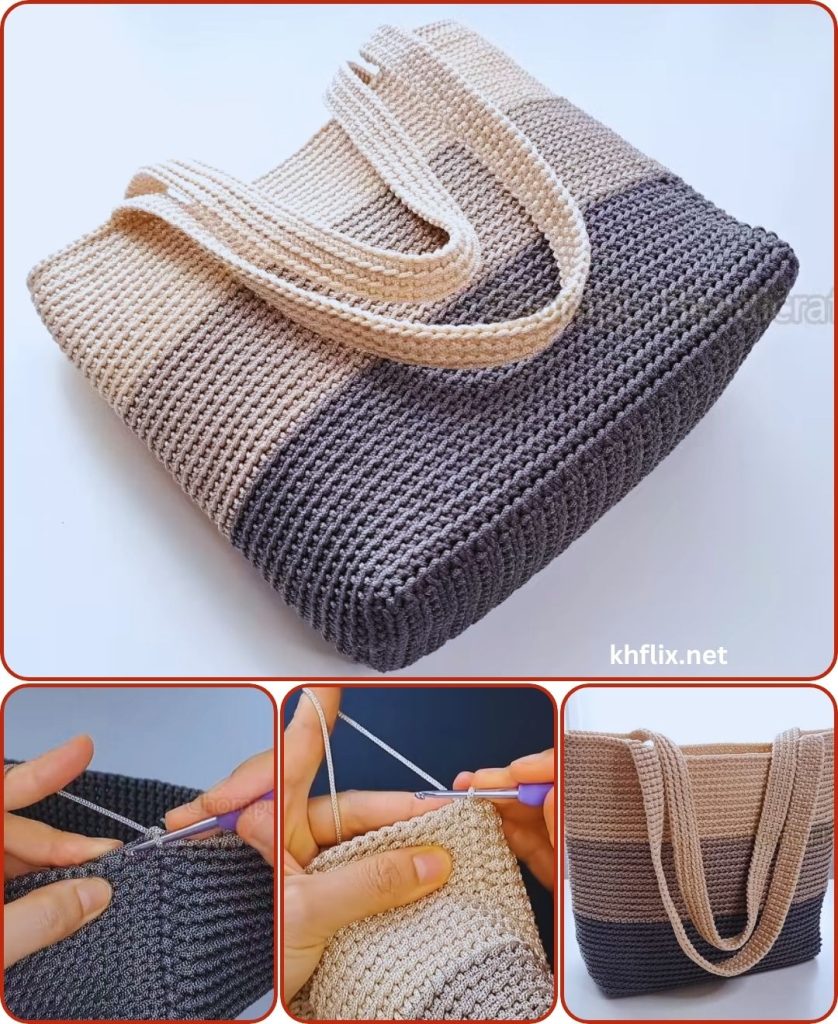
Step D: Finishing the Top Edge
After you’ve completed 5 rounds over the straps, you can finish the bag for a clean top edge.
- Work one final round of
$sl\ st$in each stitch around. This creates a neat, braided-look border that won’t stretch. - When you’ve slip stitched all the way around, cut your yarn, leaving a 6-inch tail. Fasten off and use your tapestry needle to weave in the end invisibly. Weave in the starting tail from the base as well.
Part 4: Elevating Your Creation – Finishing & Customization
Your bag is complete, but a few final touches can make it even more special.
- Add Simple Stripes: If you’re feeling adventurous, you can easily add stripes. Simply complete the last stitch of a round with a new color, and work as many rounds as you’d like before switching back. This is a great way to use up scrap yarn.
- Add a Tassel or Pom-Pom: A chunky, handmade tassel attached to the base of one of the straps adds a perfect touch of boho-chic personality.
- Sew in a Fabric Lining: While not necessary due to the dense fabric, adding a fabric lining can give your bag a department-store finish and is a great way to add an internal pocket.
Part 5: Caring for Your Handmade Tote
Your 100% cotton tote is built to be used!
- Washing: Machine wash on a cold, gentle cycle.
- Drying: Lay the bag flat and reshape it to air dry. Do not put it in a machine dryer, as it may shrink.
Congratulations! You have successfully created a beautiful, durable, and highly functional tote bag using the most fundamental stitch in crochet. You have built something strong and lasting from a simple thread, and you should be incredibly proud of your work. Enjoy your perfect, handmade tote!