 by
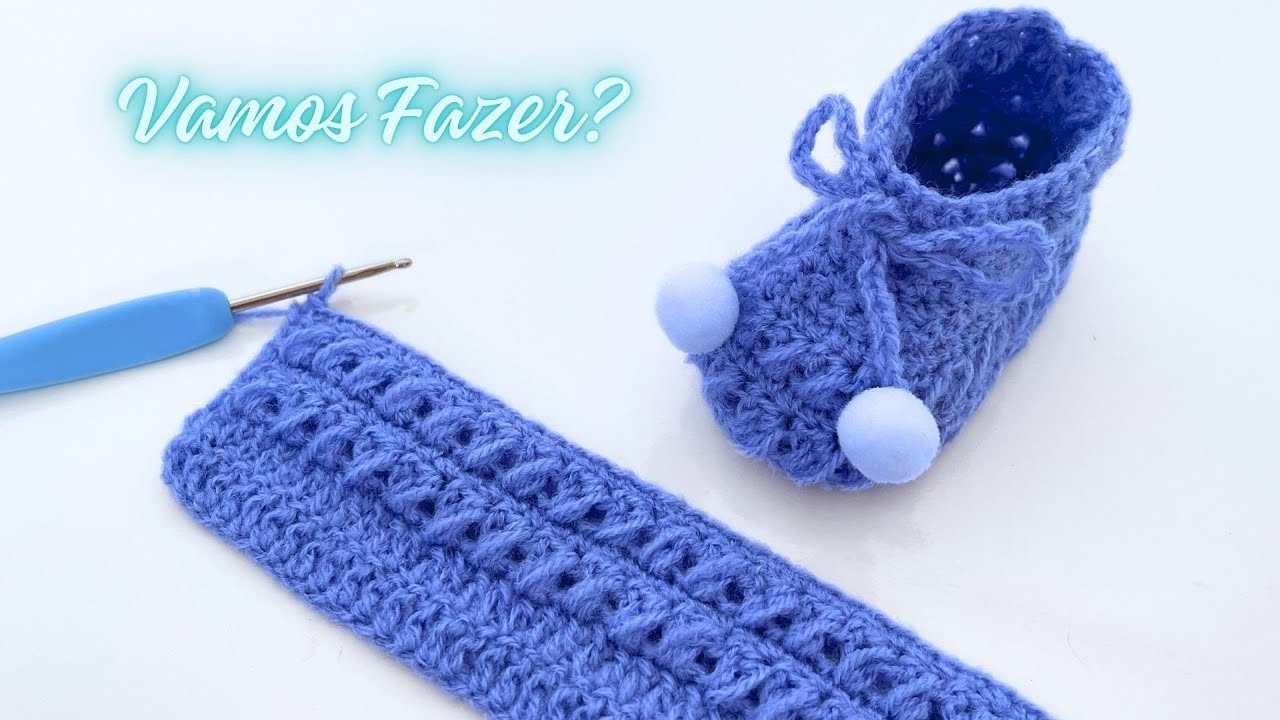
by Here is a detailed, step-by-step tutorial for what is arguably one of the “cutest” and most classic styles of baby booties: the Fold-Over Cuff Bootie.
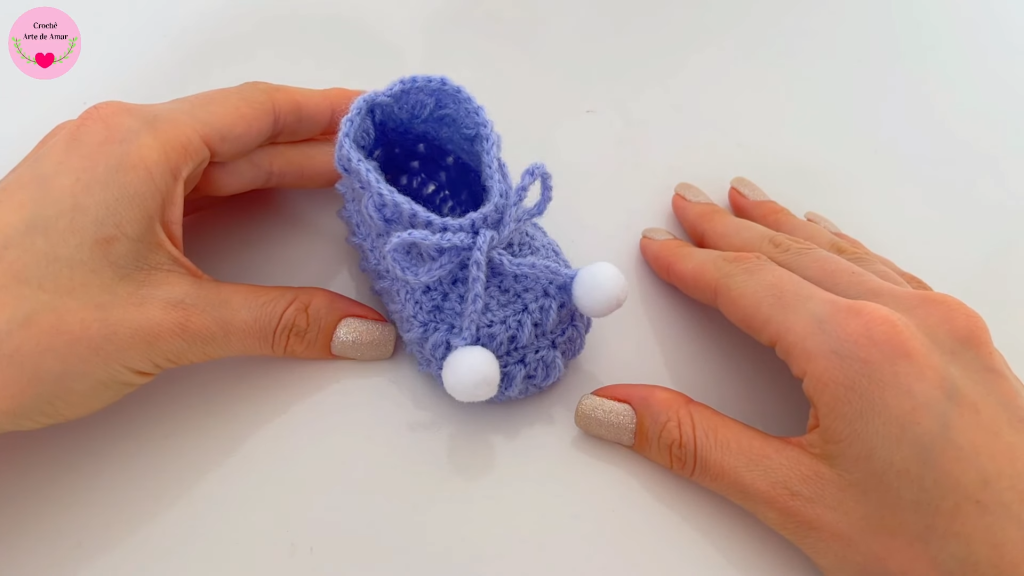
This pattern creates a tiny, sock-like shoe with a contrasting sole and a cozy cuff that you can fold down. We will make this pair in a beautiful blue, with a crisp white accent for the sole and cuff to truly make it “pop” and reach maximum cuteness!
This pattern is perfect for a confident beginner.
How to Crochet the Cutest Baby Booties (in Blue!)
This tutorial will guide you through creating a 0-6 month size bootie. We will construct it from the sole up, shape the toe, and finish with a fold-over cuff.
Materials You’ll Need
- Yarn: Soft Baby Yarn (DK / 8-ply or Worsted / 10-ply). A soft acrylic or cotton blend is ideal.
- Main Color (MC): Blue (approx. 50g)
- Accent Color (AC): White (approx. 20g)
- Crochet Hook: A size appropriate for your yarn. A 4.0mm (G/6) hook is a great choice for DK yarn.
- Yarn Needle (Tapestry Needle): For seaming and weaving in all those ends.
- Stitch Markers: At least 2. These are very helpful for marking the toe section.
- Scissors
Key Stitches (US Terms)
- ch: Chain
- sl st: Slip Stitch
- sc: Single Crochet
- hdc: Half Double Crochet
- hdc2tog: Half Double Crochet 2 Together (a decrease)
- How to hdc2tog: Yarn over, insert hook into the first stitch, pull up a loop. Yarn over, insert hook into the next stitch, pull up a loop. You now have 5 loops on your hook. Yarn over and pull through all 5 loops. This turns two stitches into one.
- BLO: Back Loop Only
Sizing
This pattern makes a 0-6 month bootie with a sole length of approximately 4 inches (10 cm).
- For a Newborn size (3.5 inches): Start with a chain of 9.
- For a 6-12 month size (4.5 inches): Start with a chain of 13 and add an extra increase round to the sole.
Part 1: The Sole (Make 2)
We’ll start with the sole, using your Accent Color (AC) – White.
- Foundation: With White Yarn, ch 11.
- Round 1:
- Work 2 hdc in the 3rd ch from the hook (the first 2 chs count as 1 hdc).
- Work 1 hdc in each of the next 7 chains.
- Work 5 hdc in the last chain (this is the toe-end turn).
- Now, working down the other side of the foundation chain: 1 hdc in each of the next 7 chains.
- Work 3 hdc in the last chain (the same one you started in).
- Join with a sl st to the top of the starting ch-2. (Total: 26 stitches)
- Round 2:
- Ch 2 (counts as 1 hdc). Work 1 hdc in the same first stitch.
- Work 2 hdc in the next stitch (the heel is now turning).
- Work 1 hdc in each of the next 7 stitches.
- Work 2 hdc in each of the next 5 stitches (this is the toe turn).
- Work 1 hdc in each of the next 7 stitches.
- Work 2 hdc in each of the last 3 stitches (the heel finishes turning).
- Join with a sl st to the top of the starting ch-2. (Total: 38 stitches)
- Round 3:
- Ch 1. Work 1 sc in each stitch around.
- Join with a sl st to the first sc. (Total: 38 stitches)
Fasten off the White yarn. Weave in your ends for the sole. Make a second sole exactly the same way.
Part 2: The Bootie Upper (The Blue Part)
This part builds the walls of the shoe up from the sole.
- Join Yarn: Attach your Main Color (MC) – Blue yarn with a sl st to the center-most stitch at the heel of the sole.
- Round 1 (The Ridge):
- Ch 1. Work 1 sc in the Back Loop Only (BLO) of every stitch around.
- This BLO round is a key “cute” detail: it creates a sharp, professional-looking edge between the white sole and the blue shoe.
- Join with a sl st to the first sc. (38 stitches)
- Round 2 & 3 (Build Height):
- Ch 2 (counts as 1 hdc). Work 1 hdc (in both loops now) in each stitch around.
- Join with a sl st to the top of the starting ch-2.
- Repeat this round one more time. You will have 38 stitches at the end of Round 3.
Part 3: Shaping the Toe
This is where the magic happens! We’ll use decreases at the toe to create the foot shape.
- Round 4 (First Decrease Round):
- Ch 2 (counts as 1 hdc). Work 1 hdc in the next 10 stitches.
- (Now for the toe decreases): Work (hdc2tog) 8 times.
- Work 1 hdc in each of the last 11 stitches.
- Join with a sl st to the top of the starting ch-2. (Total: 30 stitches)
- Round 5 (Second Decrease Round):
- Ch 1. Work 1 sc in the next 10 stitches.
- (More toe decreases): Work (hdc2tog) 5 times.
- Work 1 sc in each of the last 10 stitches.
- Join with a sl st to the first sc. (Total: 25 stitches)
The main foot shape of your blue bootie is now complete!
Part 4: The Ankle and Fold-Over Cuff
Now we build the ankle cuff that will be folded down.
- Round 6 (Ankle):
- With your Blue yarn still attached:
- Ch 1. Work 1 sc in each stitch around the ankle opening.
- Join with a sl st to the first sc. (25 stitches)
- Round 7 (Ankle):
- Ch 1. Work 1 sc in each stitch around.
- Join with a sl st to the first sc. (25 stitches)
- Change color: On the final slip stitch, drop the blue yarn and pull through your White (AC) yarn to complete the stitch.
- Round 8 (Cuff):
- With White yarn, ch 1. Work 1 sc in each stitch around.
- Join with a sl st to the first sc. (25 stitches)
- Round 9 & 10 (Cuff):
- Repeat Round 8 for two more rounds, or until the white cuff is as tall as you’d like it (about 1.5 inches total).
Fasten off the white yarn, leaving a 6-inch tail.
Part 5: Finishing Touches
This is what makes it “cute”!
- Weave in ALL Ends: This is the most important step for a clean, professional look. Use your yarn needle to securely weave in all the tails on the inside of the bootie.
- Fold the Cuff: Take the white ankle cuff and simply fold it down over the blue part of the bootie.
- Optional Tie (Highly Recommended):
- With your White yarn, chain 100 (or about 15-18 inches long).
- Fasten off and tie small knots at the very ends.
- Using your yarn needle, weave this chain-tie through the stitches at the ankle (where the blue and white meet).
- Tie in a gentle bow at the front. This not only looks adorable but also helps keep the bootie on the baby’s foot.
Repeat all parts to make the second, matching bootie.
Congratulations! You have a truly adorable (and very blue!) pair of classic cuffed baby booties.