by
by You’re looking for a specific “shoulder shape” in your crochet bag, which implies a design that contours comfortably to the body or shoulder, rather than a simple straight top edge. This usually means creating a curved top opening. We’ll achieve this by working the bag in two separate panels with shaped tops, then joining them, and finally adding an integrated strap.
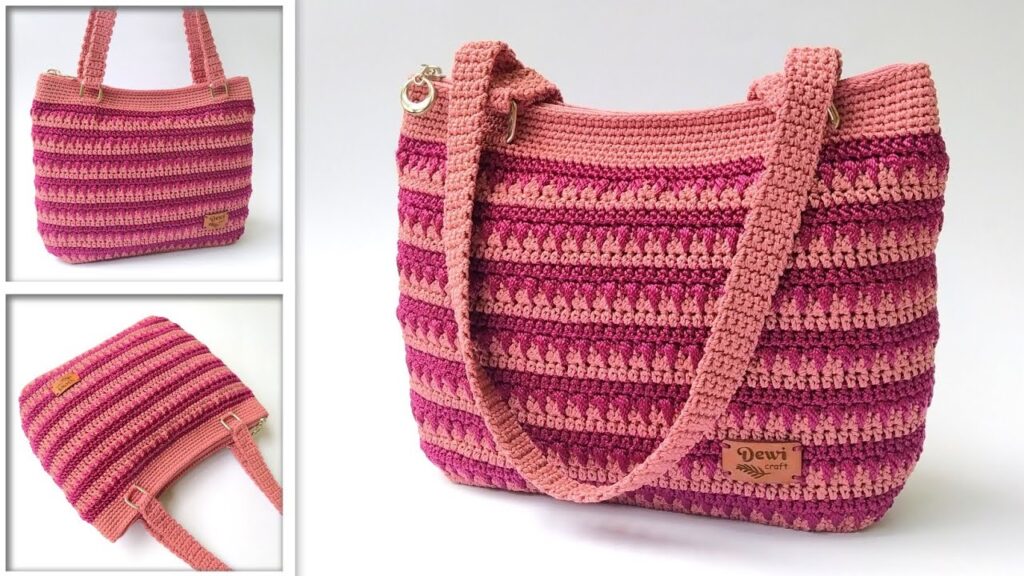
This tutorial will guide you through making a beautifully designed multicolor shoulder-shaped bag.
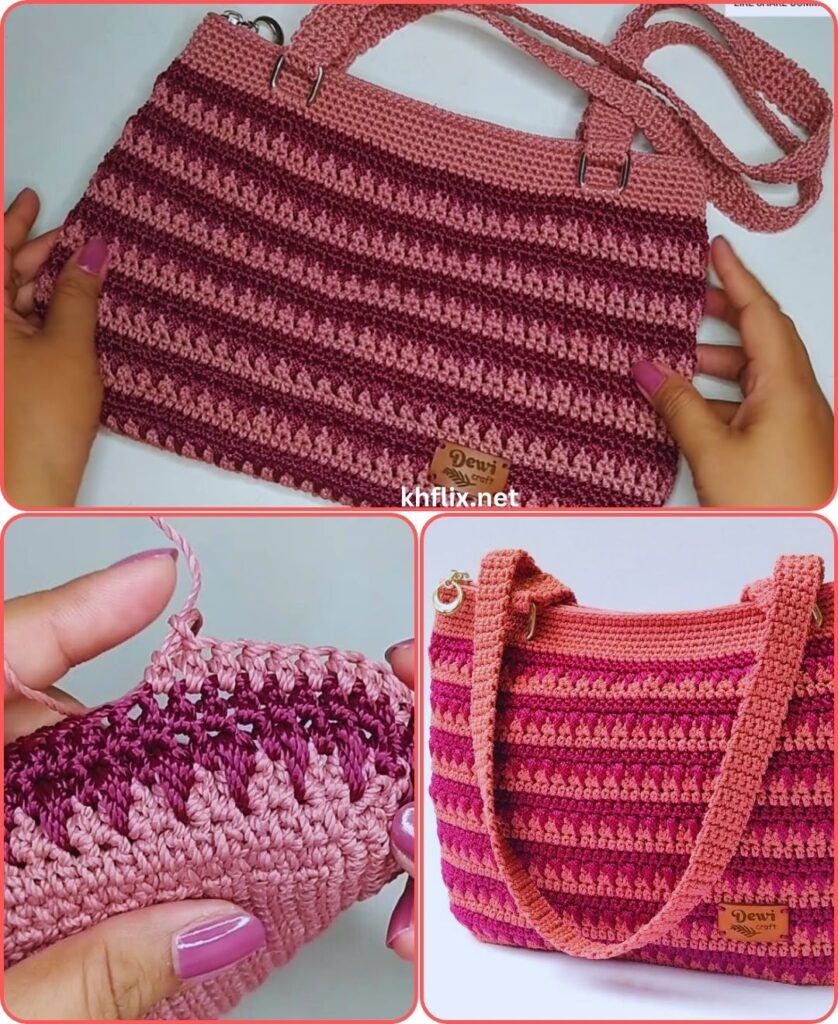
Crochet Shoulder-Shape Bag Tutorial: Multicolor Design
Project Overview: This pattern creates a unique shoulder bag with a distinct curved top edge designed to sit comfortably under your arm. The bag is constructed from two identical crocheted panels that are then joined. Multicolor stripes add visual interest, and a sturdy, integrated strap completes the design.
Skill Level: Intermediate to Advanced (Requires familiarity with basic stitches, working in rows with increases/decreases for shaping, managing color changes neatly, and joining pieces).
Finished Bag Dimensions (Approximate):
- Width (at widest point, near base): Approximately 13 inches (33 cm)
- Height (at center of curve): Approximately 9.5 inches (24 cm)
- Height (at side where strap connects): Approximately 6.5 inches (16.5 cm)
- Strap Length: Approximately 45-50 inches (114-127 cm) – adjustable
Materials You’ll Need:
- Yarn:
- Worsted Weight (Medium #4) Cotton or Sturdy Acrylic Yarn: Approximately 600-750 yards (550-685 meters) total.
- Color A (Main/Base/Strap): Approx. 250-300 yards (e.g., Deep Teal, Navy, Burgundy).
- Color B (Stripe 1): Approx. 120-150 yards (e.g., Mustard Yellow, Coral).
- Color C (Stripe 2): Approx. 120-150 yards (e.g., Cream, Olive Green).
- Color D (Stripe 3/Optional): Approx. 60-80 yards (e.g., Rust, Light Blue).
- Why these yarns? Cotton is excellent for bags due to its durability, good stitch definition, and minimal stretch. Sturdy acrylic yarns are also a great alternative. Avoid very soft or overly stretchy yarns if you want your bag to hold its shape well.
- Crochet Hook:
- Size H/5.0mm (or the hook size that gives you a dense, firm fabric. Consistent gauge is crucial for matching panels and achieving the correct shape).
- Yarn Needle (Tapestry Needle): For weaving in ends and seaming the panels.
- Scissors
- Stitch Markers (Highly Recommended): To mark the beginning/end of rows, decrease points, and strap placement.
- Optional:
- Fabric for lining (about 1 yard).
- Sewing machine or hand-sewing needle and matching thread (if adding a lining).
- Magnetic snap closure or a zipper.
Gauge (Crucial for Consistent Shape and Size!):
With Color A and your H/5.0mm hook, working in single crochet (sc):
- 14 sc = 4 inches (10 cm) wide
- 16 sc rows = 4 inches (10 cm) high
Your fabric should feel firm and dense. Adjust your hook size as needed to achieve this gauge. Consistent tension is vital for matching panels.
Abbreviations Used:
- ch: chain
- sl st: slip stitch
- sc: single crochet
- hdc: half double crochet
- dc: double crochet
- st(s): stitch(es)
- inc: increase (work 2 stitches into the same stitch)
- sc2tog: single crochet 2 together (decrease)
- BLO: back loop only
- FO: fasten off
- RS: Right Side
- WS: Wrong Side
Understanding Bag Construction & Multicolor Stripes:
This bag is constructed in distinct parts:
- Two Identical Panels: You’ll crochet a front and a back panel. Each panel will have a straight bottom and sides, but the top will be shaped with decreases to create the “shoulder curve.”
- Multicolor Stripes: Colors will be changed after a set number of rows within each panel to create horizontal stripes.
- Joining Panels: The two panels will be crocheted together along their bottom and side edges.
- Integrated Strap: The strap will be crocheted directly from the top edges of the joined panels, forming a continuous, sturdy loop.
How to make neat Color Changes for Stripes (at the end of a row):
- When you are working the very last stitch of the row with the current color, stop when you have 2 loops left on your hook.
- Drop the current color.
- Pick up the new color, yarn over with the new color, and pull it through the remaining 2 loops on your hook to complete the stitch.
- Turn your work and continue with the new color.
- After completing the color change, you can cut the old color yarn, leaving a tail of about 4-6 inches (10-15 cm) to weave in securely.

Part 1: The Bag Panel (Make 2 identical panels)
Each panel is worked flat in rows.
Starting with Color A:
- Foundation Chain: Ch 46. (This will be the widest part of your bag’s base).
- Row 1 (RS): Sc in 2nd ch from hook and in each ch across. (Total: 45 sc).
- Ch 1, turn.
- Row 2 (WS): Sc in each sc across. (Total: 45 sc).
- Ch 1, turn.
- Rows 3-6 (Color A): Repeat Row 2. (You will have 6 rows of Color A total).
- On the last sc of Row 6, change to Color B.
- Ch 1, turn.
Stripe Sequence (Work 4 rows per color):
- Rows 7-10 (Color B): Sc in each sc across. (Total: 45 sc per row).
- On the last sc of Row 10, change to Color C.
- Ch 1, turn.
- Rows 11-14 (Color C): Sc in each sc across. (Total: 45 sc per row).
- On the last sc of Row 14, change to Color D (if using).
- Ch 1, turn.
- Rows 15-18 (Color D – Optional): Sc in each sc across. (Total: 45 sc per row).
- On the last sc of Row 18, change to Color A.
- Ch 1, turn.
Shaping the Shoulder Curve (Still alternating colors in 4-row stripes):
Now we will begin decreasing to create the distinctive curve at the top of the bag. Continue the stripe sequence, changing colors every 4 rows, but incorporate the decreases.
- Row 19 (Color A – Decrease Row):Sc2tog (decrease) over the first 2 sc. Sc in each sc across until 2 sc remain. Sc2tog over the last 2 sc. (Total: 43 sc).
- Ch 1, turn.
- Rows 20-22 (Color A – Straight Rows): Sc in each sc across. (Total: 43 sc per row).
- On the last sc of Row 22, change to Color B.
- Ch 1, turn.
- Row 23 (Color B – Decrease Row):Sc2tog over the first 2 sc. Sc in each sc across until 2 sc remain. Sc2tog over the last 2 sc. (Total: 41 sc).
- Ch 1, turn.
- Rows 24-26 (Color B – Straight Rows): Sc in each sc across. (Total: 41 sc per row).
- On the last sc of Row 26, change to Color C.
- Ch 1, turn.
- Row 27 (Color C – Decrease Row):Sc2tog over the first 2 sc. Sc in each sc across until 2 sc remain. Sc2tog over the last 2 sc. (Total: 39 sc).
- Ch 1, turn.
- Rows 28-30 (Color C – Straight Rows): Sc in each sc across. (Total: 39 sc per row).
- On the last sc of Row 30, change to Color D (if using).
- Ch 1, turn.
- Row 31 (Color D – Decrease Row):Sc2tog over the first 2 sc. Sc in each sc across until 2 sc remain. Sc2tog over the last 2 sc. (Total: 37 sc).
- Ch 1, turn.
- Rows 32-34 (Color D – Straight Rows): Sc in each sc across. (Total: 37 sc per row).
- On the last sc of Row 34, change to Color A.
- Ch 1, turn.
- Row 35 (Color A – Decrease Row):Sc2tog over the first 2 sc. Sc in each sc across until 2 sc remain. Sc2tog over the last 2 sc. (Total: 35 sc).
- Ch 1, turn.
- Rows 36-38 (Color A – Straight Rows): Sc in each sc across. (Total: 35 sc per row).
- FO Color A after Row 38 for the first panel.
Make a second identical panel. Ensure both panels match in size and shape.
Part 2: Joining the Panels
We will join the two panels by crocheting them together. This creates a neat, strong seam and the depth of the bag.
- Place the two panels on top of each other, aligning them perfectly. Make sure the right sides (RS) are facing outwards.
- Starting at one bottom corner, join Color A with a sl st through both layers of the corner stitch.
- Round 1 (Joining):
- Ch 1. Sc in the same stitch (through both layers).
- Continue working sc stitches evenly around the bottom and side edges of the bag, going through both layers of the panels.
- Tips for even spacing:
- For each row end along the sides, aim for 1 sc per row (or slightly more/less if needed to prevent buckling or puckering).
- Work 3 sc into each corner stitch to create a smooth turn.
- Work all the way around the bottom and up the sides. Stop when you reach the beginning of the curved top opening on the other side.
- Sl st to the first sc to join.
- FO Color A, leaving a long tail for weaving in.
- Your bag now has an opening at the top, defined by the curved edges of the panels.
Part 3: The Integrated Shoulder Strap (Color A)
The strap will be built directly from the top curved opening of the bag.
- Mark Strap Placement: Lay your joined bag flat. Visually divide the curved top opening into sections. You want the strap to come from the ‘highest’ points of the curve (where the side edges meet the beginning of the curve). Place stitch markers at these points on both the front and back of the bag’s opening. This will be where your strap begins. Ensure the strap will be approximately 4-5 stitches wide.
- Create Strap – Section 1:
- Join Color A with a sl st to the inside edge of one of your marked strap points (on the top curved opening).
- Row 1: Ch 1. Work 1 sc in the same stitch and in the next 3-4 stitches (the width you want for your strap). (Total: 4-5 sc).
- Ch 1, turn.
- Row 2: Work 1 sc in each sc across.
- Ch 1, turn.
- Repeat Row 2 until this strap section measures approximately 20-24 inches (50-60 cm). This forms half of your total shoulder strap. Do NOT FO. Keep the loop on your hook.
- Create Strap – Section 2:
- Go to the other side of the bag’s opening (the second pair of stitch markers).
- Rejoin Color A with a sl st to the inside edge of one of your second set of marked strap points.
- Repeat the process from “Create Strap – Section 1” until this second strap section is the same length. Do NOT FO.
- Connecting the Strap Sections:
- Now you have two separate strap sections extending from either side of your bag.
- With the loop still on your hook from the end of the second strap section, align the ends of the two strap sections.
- You can connect them by placing the two ends together and working a row of slip stitches or single crochets through both layers across the width to join them securely. Make sure the strap is not twisted!
- Reinforcing and Edging the Opening:
- After joining the strap, continue working sc stitches evenly around the entire opening of the bag, including along the curved top edges and around the newly joined strap. This will give a clean, finished edge and reinforce the strap connection.
- Work 1-2 more rounds of sc around this entire perimeter for extra durability and a polished look.
- Sl st to join the final round.
- FO Color A, leaving a tail to weave in.
Part 4: Finishing & Assembly
- Weave in All Ends: This is a crucial step for a clean, professional, and durable finish. Use your yarn needle to thoroughly weave in all loose yarn tails from the bag panels, color changes, and strap. Be sure they are secured well on the inside of the bag to prevent them from unraveling or showing through the stitches.
- Blocking (Highly Recommended): Blocking is very beneficial for shaped crochet pieces.
- Gently mist your entire bag with water until it’s damp, or gently submerge it (do not wring).
- Lay the bag flat on a clean, dry surface or a blocking mat. Gently shape it, ensuring the bottom is flat, the sides are even, and the top curve is well-defined. You can stuff the bag lightly with towels or paper to help it hold its form.
- Allow the bag to air dry completely.
- Optional: Add a Fabric Lining (Highly Recommended for Durability & Functionality):
- A fabric lining will protect your crocheted stitches from stretching, prevent small items from slipping through any tiny gaps, and give your bag a more polished, professional finish.
- Measure: Measure the exact dimensions of your finished crocheted bag (width at widest point, height at center, depth/bottom panel if you made one, or the width of the crocheted seam).
- Cut Fabric: Cut two pieces of fabric to match the shape of your crocheted panels, adding a 1/2-inch (1.25 cm) seam allowance all around. Cut a rectangular strip for the bottom and sides (width of your seam, length of your bag’s perimeter).
- Sew Lining: Sew the fabric pieces together to create a fabric bag matching your crochet bag. Hem the top edge of the lining.
- Insert & Attach: Carefully place the finished fabric lining inside your crocheted bag. Hand-stitch the top hem of the lining to the inside top edge of your crocheted bag using small, neat stitches that don’t show through.
- Optional: Add a Closure:
- Magnetic Snap: Sew a magnetic snap closure (1 set) to the top center inside of the bag’s opening.
- Zipper: For advanced users, a zipper can be sewn into the top opening.
- Button/Loop: Sew a large decorative button to one side of the opening, and crochet a small chain loop on the other side to fit over it.
Your unique, handmade, multicolor crochet shoulder-shape bag is now complete and ready to show off!