 by
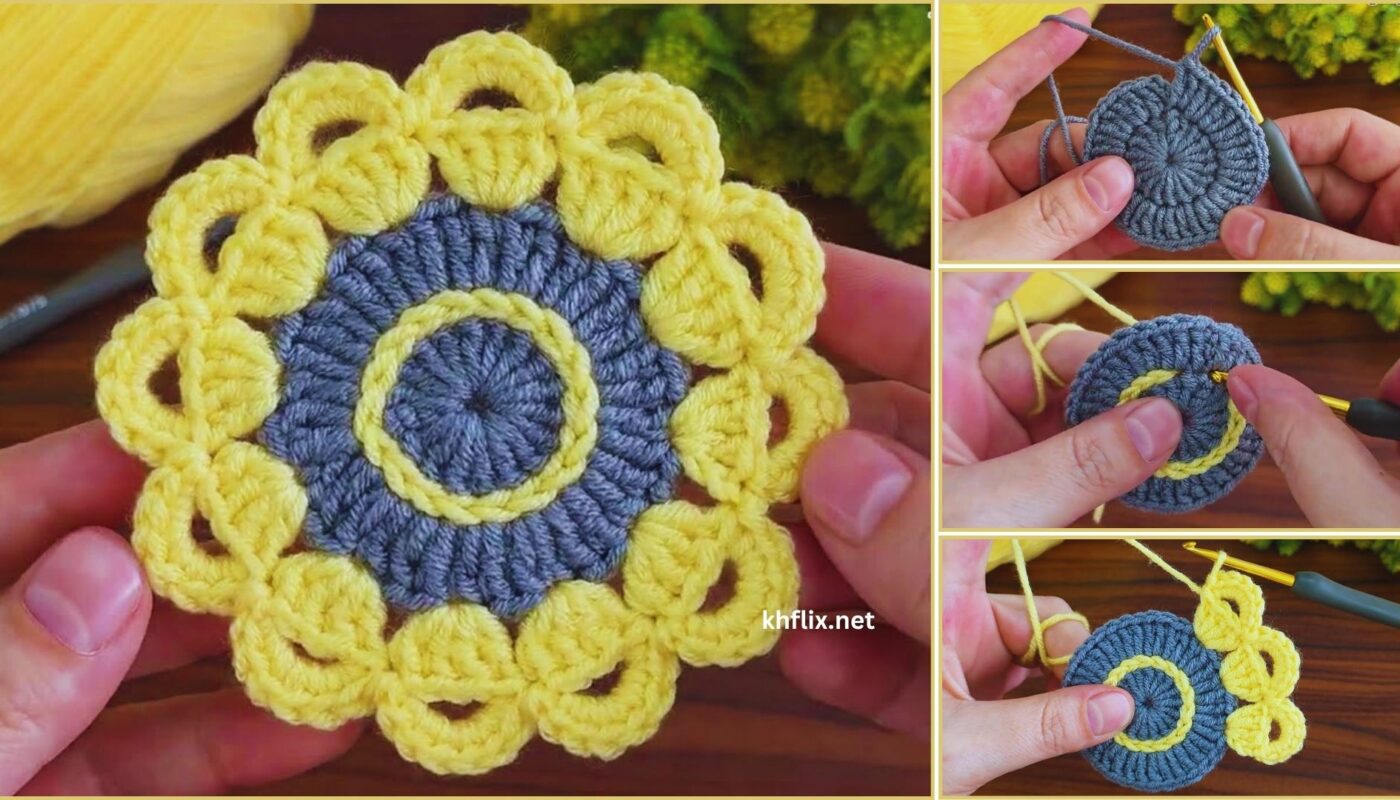
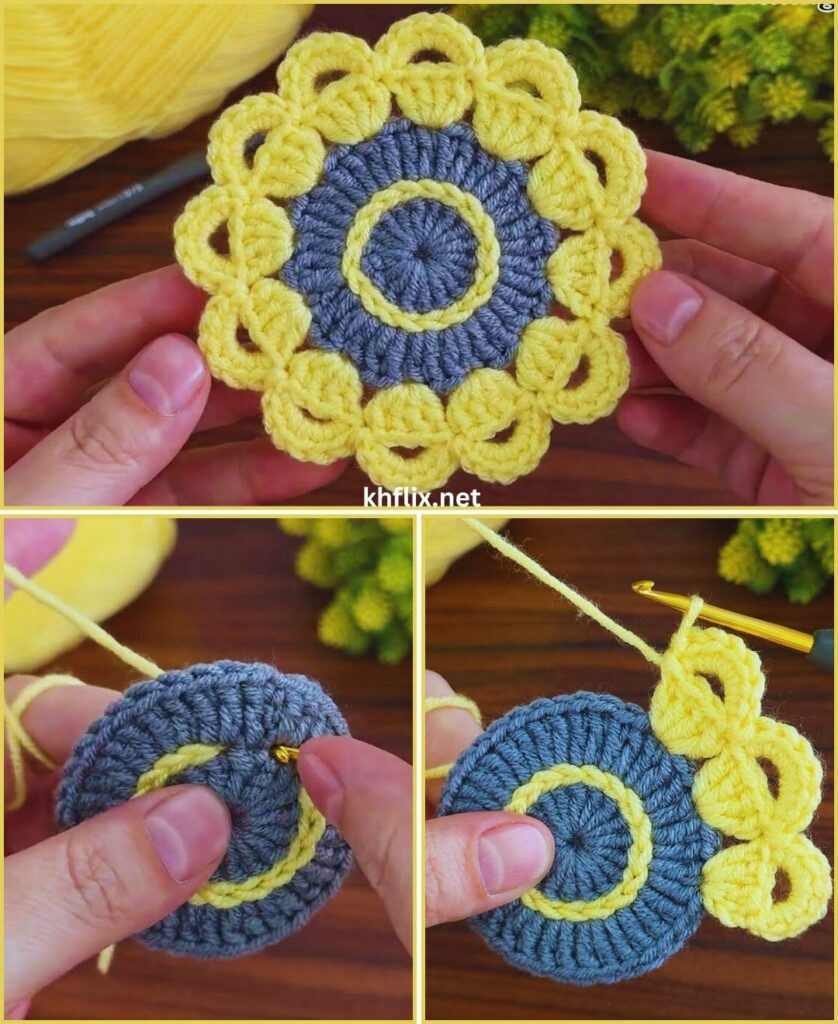
by Let’s crochet a cheerful and vibrant yellow 3D flower coaster! This project is a fantastic way to combine practicality with beautiful dimension, adding a sunny pop of handmade charm to your home. The 3D element makes it stand out and look much more intricate than it is to create.
How to Make a Beautiful Yellow 3D Crochet Flower Coaster: Detailed Tutorial
This pattern will guide you through building a multi-layered flower that truly pops, giving your coaster a gorgeous, realistic effect. You’ll work in layers, starting with a base and then adding petals to create that wonderful dimension.
Skill Level: Intermediate
You’ll need to be comfortable with:
- Chain (ch): The basic foundation.
- Slip Stitch (sl st): For joining rounds and neatening.
- Single Crochet (sc): A compact, dense stitch.
- Half Double Crochet (hdc): A medium-height stitch.
- Double Crochet (dc): A taller stitch.
- Treble Crochet (tr): An even taller stitch (sometimes called triple crochet).
- Working in rounds: Crocheting in a circular motion.
- Increasing: Adding stitches to expand your work.
- Magic Ring (MR) or Adjustable Ring: Highly recommended for a tight center.
- Working into front loops only (FLO) and back loops only (BLO): This technique is crucial for creating distinct layers of petals.
- Working into chain spaces and skipped stitches: For precise petal placement.
Finished Coaster Dimensions (Approximate):
Your finished 3D flower coaster will typically measure around 4.5 to 6 inches (11.5 to 15 cm) in diameter. This can vary based on your yarn thickness, hook size, and the puffiness of your petals.
Materials You’ll Need:
- Yarn: Approximately 40-70 yards (37-64 meters) of Worsted Weight (Medium #4) Cotton Yarn in Yellow.
- Why Cotton? Cotton yarn is ideal for coasters due to its absorbency, durability, and heat resistance. Acrylic can melt when exposed to very hot temperatures, so cotton is a safer and more practical choice.
- Color Choice: Any vibrant shade of yellow will make a beautiful, cheerful flower coaster!
- Crochet Hook: Size H/5.0mm. This size generally creates a dense but flexible fabric suitable for coasters. If your stitches feel too loose or too stiff, adjust your hook size accordingly.
- Yarn Needle (Tapestry Needle): Essential for seamlessly weaving in all your loose yarn tails.
- Scissors: For cutting yarn.
Gauge:
While gauge isn’t critical for a coaster’s precise fit, consistent tension is paramount. It ensures your coaster lies flat, and your petals are evenly sized and well-defined. If your stitches are too loose, the coaster might be floppy; too tight, and it could curl or pucker.
Abbreviations Used in This Pattern:
- ch: chain
- sl st: slip stitch
- sc: single crochet
- hdc: half double crochet
- dc: double crochet
- tr: treble crochet (yarn over twice before inserting hook)
- st(s): stitch(es)
- sp: space
- ch-sp: chain space
- MR: Magic Ring (also called Magic Circle or Adjustable Ring)
- FLO: Front Loop Only (work into the loop closest to you)
- BLO: Back Loop Only (work into the loop furthest from you)
- rep: repeat
- FO: Fasten Off
- (): repeat instructions within parentheses a specified number of times.
- []: indicates the total number of stitches at the end of a specific round.
The Secret to 3D Flowers: Layering with FLO/BLO
The magic behind a 3D crochet flower lies in strategically using the front loop only (FLO) or back loop only (BLO) of a stitch. When you work into only one loop, the other loop remains unworked. This unworked loop then becomes a perfect foundation for crocheting a new layer of petals behind or in front of the previous one, creating incredible depth and dimension in your flower.
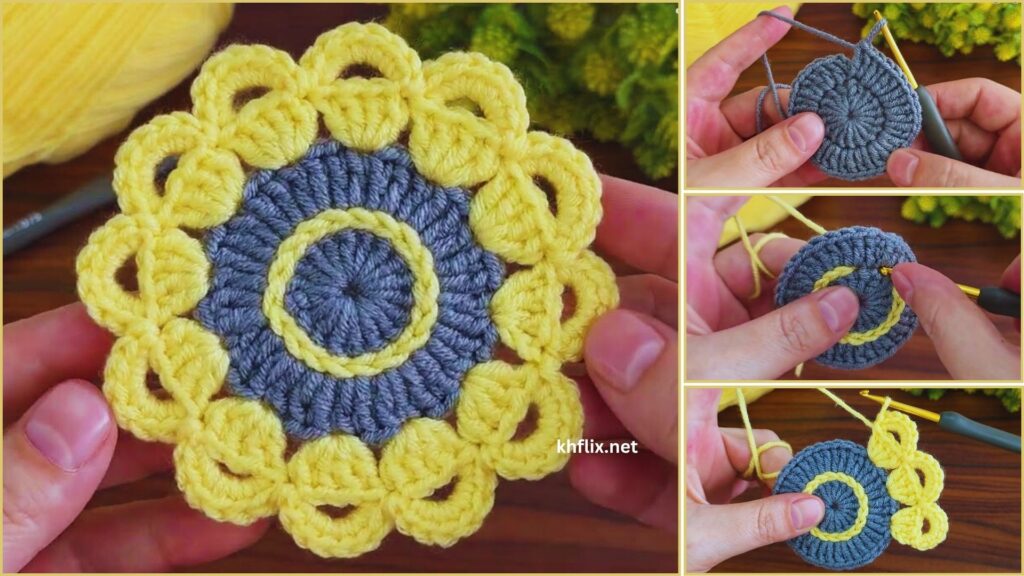
Let’s Crochet Your Beautiful Yellow 3D Flower Coaster!
This pattern builds the flower from the center outwards, adding layers of petals and then a sturdy backing for functionality, all in cheerful yellow.
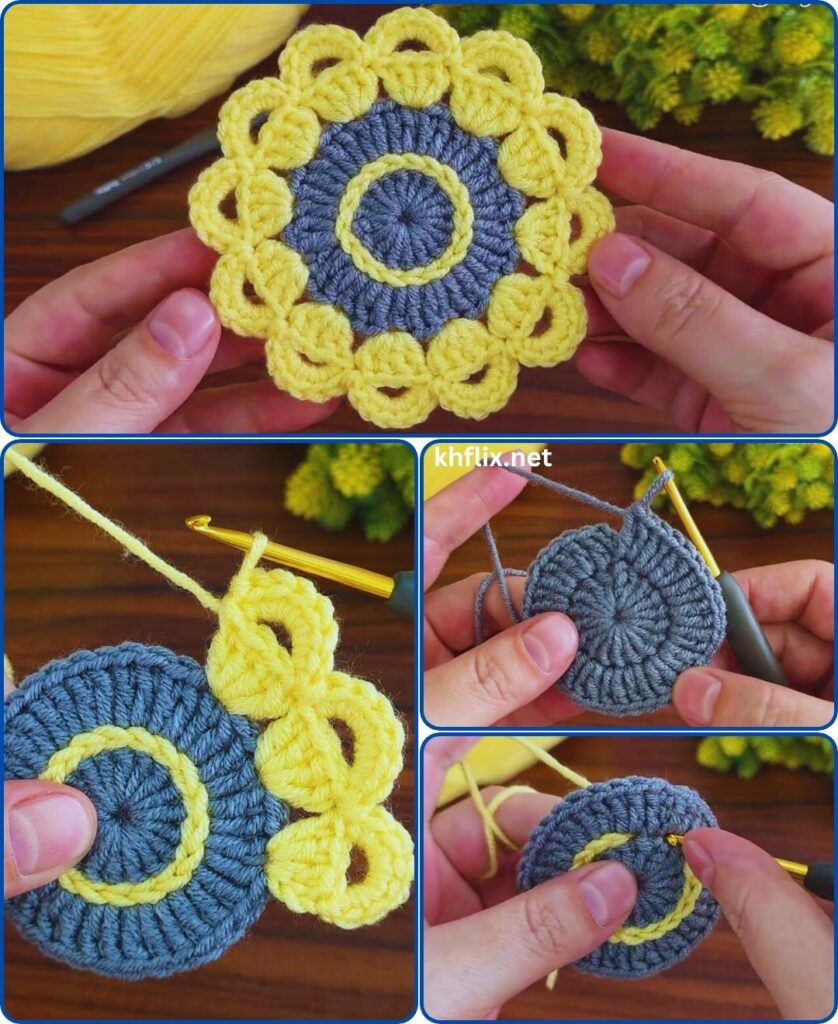
Part 1: Flower Center & Base for Petals
- Start: Make a Magic Ring (MR).
- Alternative Start: Chain 4, then sl st into the first ch to form a ring.
- Round 1:
- Ch 1 (does NOT count as a stitch).
- Work 10 sc into the MR.
- Pull the tail tightly to close the center hole.
- Sl st into the first sc to join the round.
- [10 sc]
- Round 2 (Base for First Petals):
- Ch 2 (does NOT count as a stitch, but gives height).
- Work 2 dc into each stitch around.
- Sl st into the top of the first dc to join.
- [20 dc]
Part 2: First Layer of 3D Petals
This layer will form your beautiful, slightly cupped, innermost petals. We’ll work into the front loops only (FLO) from Round 2.
- Round 3 (Petals – working into FLO of Round 2):
- Ch 1 (does NOT count as a stitch).
- *(Sl st into the FLO of the current stitch.
- Ch 2.
- Work 3 dc into the FLO of the next stitch.
- Ch 2.
- Sl st into the FLO of the next stitch).*
- Repeat from * to * around the entire circle. You will create 7 petals total.
- Note: Your 20 FLO stitches from Round 2 are what you’re working into. Each petal uses 3 FLOs (sl st, dc group in one, sl st). You’ll have a few FLOs left over (7 petals x 3 FLOs = 21, but you only have 20. Just distribute your petals as evenly as possible around the circle.)
- After your last petal, sl st into the very first sl st you made in this round (the one that started your first petal) to securely finish the round.
- Do NOT Fasten off.
Part 3: Second Layer of 3D Petals
Now for the larger, outer layer of petals. You’ll work behind the first set of petals, into the unworked back loops from Round 2.
- Round 4 (Petal Base – working into BLO of Round 2):
- Turn your flower over slightly. You’ll see a distinct ridge of unworked Back Loops (BLO) from Round 2 (these are behind your first set of petals).
- Ch 1 (does NOT count as a stitch).
- Work sc in the first BLO.
- Work sc in the next 19 BLOs around.
- Sl st into the first sc to join the round.
- [20 sc] (These 20 sc stitches form the base for your second layer of petals and will also be the start of your coaster’s backing.)
- Round 5 (Second Petal Layer):
- Ch 1 (does NOT count as a stitch).
- *(Sl st into the next sc (from Round 4).
- Ch 3.
- Work 1 dc into the next sc, 2 tr (treble crochet) into the next sc, 1 dc into the next sc.
- Ch 3.
- Sl st into the next sc).* This creates one large petal.
- Repeat from * to * 4 more times around. You will create 5 petals total.
- Each petal cluster uses 4 sc stitches from Round 4 (sl st, dc, 2tr, dc, sl st). To get 5 petals from 20 sc, you’ll use all stitches directly.
- After your last petal, sl st into the first sl st you made in this round to securely finish.
- Do NOT Fasten off.
Part 4: Creating the Flat Coaster Backing
To make your 3D flower a functional coaster, you’ll now build a flat back directly onto the base of your flower. This will neatly conceal all your yarn tails and provide a sturdy base.
- Preparation: You should still have yarn attached from Round 5. Your newly formed petals are pointing towards you. You’ll now be working behind these petals.
- Round 6 (Backing – working into unworked loops/stitches):
- Ch 1 (does NOT count as a stitch).
- Locate the unworked front loops of the sc stitches from Round 4 (the row you worked into before making the second set of petals). These loops will be slightly visible between the bases of the petals on the underside of your flower.
- Work sc in each of these unworked front loops (from Round 4) around the circle.
- Sl st into the first sc to join.
- [20 sc]
- Round 7 (Backing continues – increasing for flatness):
- Ch 1 (does NOT count as a stitch).
- (1 sc in next st, 2 sc in next st (sc inc)) rep 10 times around.
- Sl st into the first sc to join.
- [30 sc]
- Round 8 (Backing continues):
- Ch 1 (does NOT count as a stitch).
- (1 sc in next 2 sts, 2 sc in next st (sc inc)) rep 10 times around.
- Sl st into the first sc to join.
- [40 sc]
- Sizing Note: If your backing isn’t lying perfectly flat (e.g., curling or ruffling), you might need to adjust the increase pattern. A general rule for flat circles is to increase evenly in each round. If it curls, add another increase round (e.g.,
(1 sc in next 3 sts, 2 sc in next st)rep around). If it ruffles, you’ve increased too much in a previous round. Aim for a flat circle that matches the overall diameter of your flower.
- Fasten off (FO), leaving a 6-inch tail.
Part 5: Finishing Your 3D Flower Coaster
- Weave in All Ends:
- This is the most crucial step for a neat, durable, and beautiful coaster. Thread each yarn tail onto your yarn needle.
- Carefully weave them into the stitches on the back side of your coaster. Try to go through the middle of the stitches to fully hide the tails. Weave in one direction for a few stitches, then change direction slightly and weave back for a few stitches (this “locks” the tail in place and prevents it from unraveling).
- Take your time with this to ensure your coaster looks impeccable and will last.
- Shape:
- Gently lay your coaster flat. Use your fingers to manipulate and shape the petals, making them puff out and sit attractively. You can gently bend or cup them forward to enhance the 3D effect.
- A light steam block can be very beneficial for helping the coaster lie perfectly flat, especially the backing. To do this, hover a steamer or an iron (on a low, steam setting) over the item without touching the fabric. Then, gently shape the petals and backing with your hands while the yarn is warm and pliable. Allow it to air dry completely. Be careful not to flatten the 3D petals too much if you want them to remain prominent.
You’ve now created a truly gorgeous and intricate yellow 3D crochet flower coaster! These are special pieces that add a unique, handmade touch to your home decor. What other colors would you like to see bloom as a 3D coaster?